Using Quick Issue Version
Contents
Overview
Quick Issue is tool for issuing items quickly. Quick
Issue is designed for use in several situations common in medical centers.
- Walk-in issues of supplies - Inventory
Quick Issue Charge Only
Hospital staff occasionally
need to obtain supplies more quickly than the normal requisition and issue
processes allow. Walk-in issues at the warehouse or storeroom are common in
many medical facilities. The supplies drawn by walk-ins are commonly recorded
manually; however, the item numbers and quantities must be entered in the system
so that the appropriate departments will be charged, and the on-hand quantity
of the items will be adjusted.
- Issuing a few items to many departments - Inventory
Quick Issue
Warehouse personnel may
need to issue several stock and non-stock items to multiple departments simultaneously
and quickly. Inventory Quick Issue lets the warehouse focus on issuing the
same items to many departments.
- Requisitions for a few items listed on a long order
guide - Order Guide Quick Issue
Department personnel may
be faced with the need for a few items from an order guide. Completing the
order guide entails searching for the items -- possibly searching through
a long list. Order Guide Quick Issue is a short-cut that lets department staff
create order guide requisitions quickly and efficiently.
Inventory Quick Issue and Inventory Quick
Issue Charge Only are intended for warehouse or storeroom staff.
Order Guide Quick Issue is intended for hospital staff in other departments
who make requisitions.
This section explains how
to use Inventory Quick Issue and Inventory Quick Issue Charge Only. Order
Guide Quick Issue is described separately.
If
your site supports cross-organizational processing, you can perform Quick Issues
for departments in different organizations. Use the fields Issue to
Organization and Issue to Department to select the receiving organization
and department. (Your supplying organizations and asset locations must
first be identified, and the appropriate permissions set. See the discussion
of cross-organizational processing.)
Quick Issues for single items can also be created from the Materials Management Inventory menu. Quick Issues created from the Inventory menu bypass the pick process -- no pick list is built. The system automatically adjusts the on-hand inventory quantity. Use this path:
- From the Materials Management main Contents, select Inventory > Item Inventory or Inventory > Item Inventory - All Locations.
Mobile Applications on the iPad
If you are an iPad user, documentation for quick issues is available from the Quick Start Guide on the iPad.
Financial Reporting Fields
Your site may be set up to use Financial Reporting Fields in various parts of the application. Similarly, you may also be using Project Codes and Fund Codes.
Financial Reporting Fields, along with Project Code and Fund Code let you generate reports on non-account code fields. For example, your site might define Physician as a financial reporting field. Users could then select the physician associated with a quick issue or a requisition, for example.
If financial reporting fields are used by your site, the tab Fin Reporting appears on the panels. (Otherwise, this tab does not appear.) You can enter field values on the tabbed panel.
Details are in Using Financial Reporting Fields in ERP.
Security
Users processing Quick
Issues must have the proper authority set in the system. To assign authorities
to a user, see the discussion of User Settings.
- The Allow Inventory Quick Issue field on the User
Settings Authorities panel must be selected for the user.
- To create Department Quick Issues, users must have the "Distribution" role object set minimally to Modify in their user profiles.
Creating Quick Issues (Charge Only)
Quick Issues (Charge Only) to Departments can be created from either the Warehousing or Inventory menu. Quick Issues created from the Inventory menu bypass the pick process -- no pick list is built. The system automatically adjusts the on-hand inventory quantity.
- From the Materials Management main Contents, select Inventory > Item Inventory or Inventory > Item Inventory - All Locations
Locate the item of interest and click Menu > Quick Issue To Department.
To use Inventory Quick Issue, Charge Only
- From the Materials Management main Contents, select
Warehousing > Quick Issues. The list of pending Inventory Quick
Issue batch jobs appears, if any exist. Otherwise, No Data appears.
- Click New. The Inventory Quick Issues panel
header appears.
- Verify the information on the panel for your organization and asset location.
- In the Quick Issue Type field, select Inventory
Quick Issue Charge Only from the prompt (...). See Figure 1.
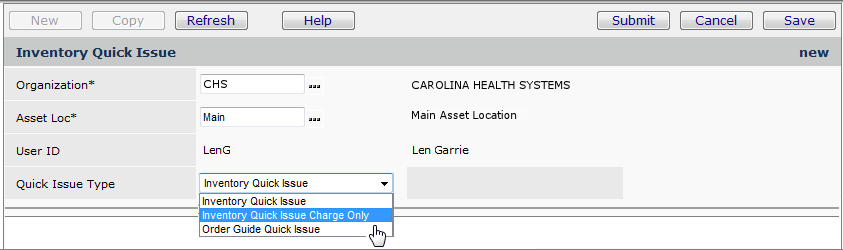
Figure 1 - Quick Issue Header Panel
-
Click Submit. The General tab appears (Figure 2).
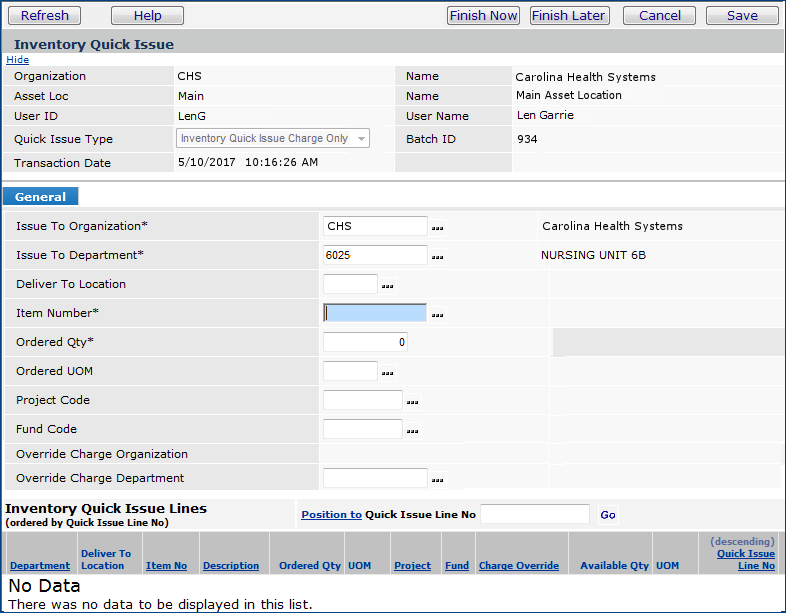
Figure 2 - Quick Issue Charge Only General Tab panel
-
Click the prompt (...) and select the Item
Number from the list.
- Enter the quantity of items next to Ordered Qty.
- Select the Issue To Department from
the list that appears at the prompt.
- Enter information in other fields as needed, then
click Save. The item appears at the bottom of the panel under Inventory Quick Issue Lines.
Note: If you are keying items in and using the tab or down arrow to move from field
to field, make sure that the cursor is in one of the header fields (and not,
for example in the Position To field) before you press Enter. Otherwise,
the system cannot accept the information that you keyed in.
-
Issue the item to more departments if you wish.
- Enter the quantity of items for the next department
in the Ordered Quantity field
- If your site does cross-organizational processing,
you can issue items to a department in a different organization. Select
the organization from the prompt in the Issue to Organization
field.
- Click the prompt for Issue To Department
and choose a new department.
- Click Save when you are finished.
- Issue the same department more items.
- Enter an item.
- Click Save after you enter each item.
- Issue a new item to a new department.
- Enter the item and department.
- Click Save.
-
Select Finish Now or Finish Later.
- If you select Finish Now, the system asks you
to confirm that you wish to submit the Quick Issue Batch job. Click Submit.
With Finish Now, the system creates a requisition
with a type of Charge Only and a status of Complete. The on-hand
quantity of the items is adjusted, and the appropriate departments are charged
for the items. No pick list is produced. No entry is made on the Inventory
Quick Issues list.
- With Finish Later, the system displays the Inventory
Quick Issues list. Your new charge-only Quick Issue batch job appears on
the list.
- Select Menu > Return
to Quick Issue Batch to finish creating your Quick Issue.
- Select Finish Now. Your
Quick Issue batch is completed. The system adjusts inventory for the item and
creates the General Ledger transactions.
The "Charge Only Document" for Quick Issues
The "Charge Only Document" prints the contents of a charge-only quick issue batch job. Each requisition appears on a separate page. The document resembles a "pick" document (Figure 3).
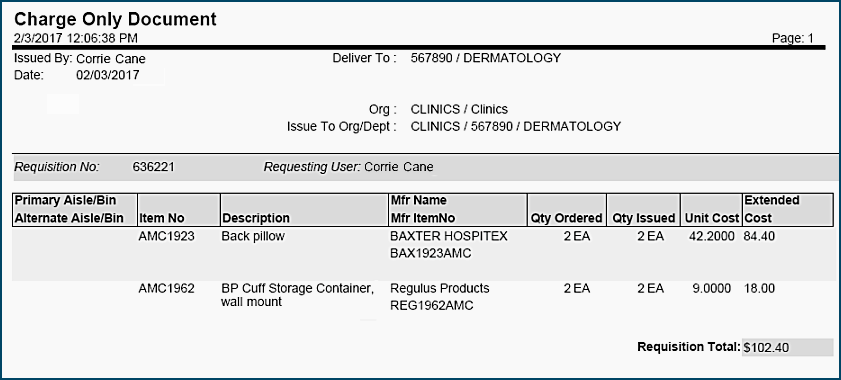
Figure 3 - The Charge Only Document for Quick Issues
Setup
Asset location records contain the field Print Document for Charge Only Quick Issues (Figure 4). When the field is selected, a document prints when you process a charge-only quick issue batch.
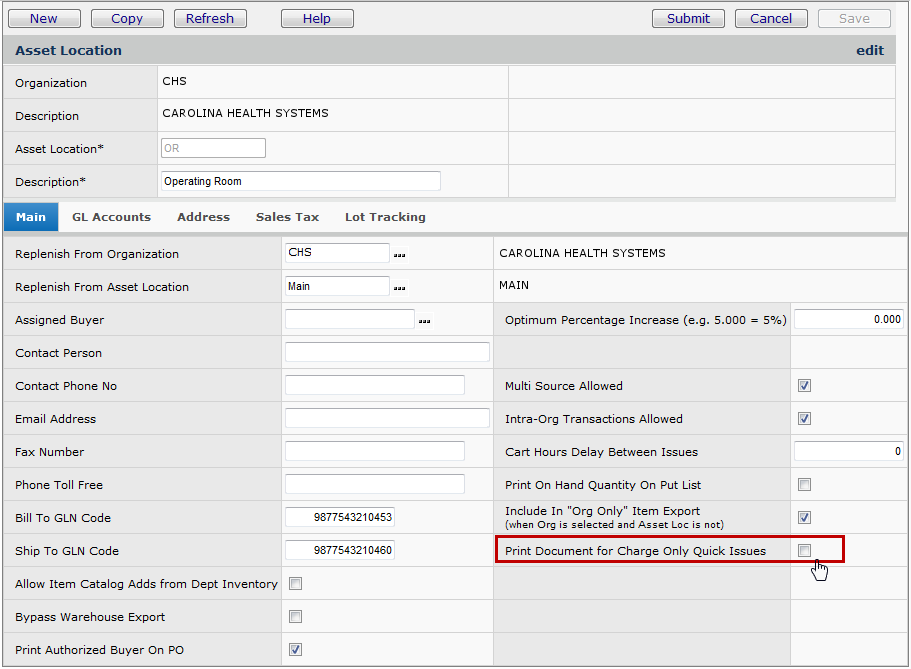
Figure 4 - The Field Print Document for Charge Only Quick Issues on an Asset Location Record
If you do not wish to print the document, un-select the option Print Charge Only Document when you process the quick issue batch job (Figure 5).
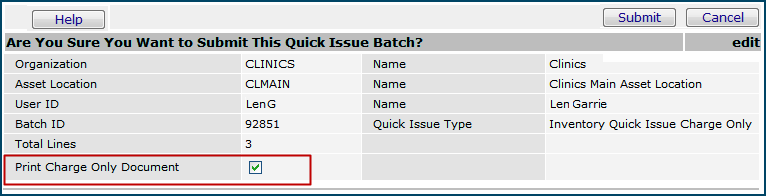
Figure 5 - Submitting a Charge Only Quick Issue Batch
Note: for a quick issue batch job, the print document option only appears when the asset location's print document field is selected.
The "Charge Only Document" is also available from the Reports menu.
- From the main Contents, select Reports > My Archived Reports.
To use Inventory Quick Issue
- Review your Current Settings to ensure that the Asset Location is
correct. Inventory Quick Issue will issue items only from the Asset Location
in your Current Settings.
- From the Materials Management main Contents, select Warehousing > Quick
Issues. The Inventory Quick Issues list appears.
- Click New. The Inventory Quick Issues header panel appears.
- In the Quick Issue Type field, select Inventory Quick Issue
from the prompt (...).
- Click Submit. The General tab appears (Figure 2).
Note: Inventory Quick Issue has two additional fields
not shown on Figure 2:
- Immediately under Override Charge Department is the Stat
Line check box (Figure 6).

Figure 6 - Stat Line Field on Inventory Quick Issue
Select this field to create a STAT line for a non-stock, non-file,
or direct delivery item. The line will be placed on a STAT requisition and a
STAT PO. You can continue adding other lines to the Quick Issue, whether for
STAT or non-STAT items.
See STAT Purchase Orders and Purchase Order
Lines for details.
- Immediately under Stat Line is the check box Separate PO By Requisition (Figure 6). This check box is available for Inventory and Order Guide Quick Issues.
When selected, the requisition line is entered on a separate PO for the vendor. You can select this field for a non-file, non-stock, or direct delivery line. If this field is selected for multiple lines on the same requisition, and all the lines have the same vendor, the lines will go on the same PO. However, lines for the vendor from other requisitions will not go on the PO.
Note: The Separate PO by Requisition field cannot be used with Charge-Only Quick Issues.
- Click the prompt next to Item Number (...)
to view a select an item.
- Enter the quantity of the item next to Ordered Qty.
- Verify that the Issue to Organization field is correct. Otherwise,
select a new organization from the prompt.
- If your site does cross-organizational processing, you can issue items to
a department in a different organization. Select the organization from the
prompt in the Issue to Organization field.
-
Verify that the Issue to Department field
is correct. If not, select a new department from the prompt.
- Enter information in other fields as needed.
- Click Save. The item appears at the bottom
of the panel.
- Issue a single department more items.
- Leave the Issue To Department at the correct
department.
- Enter an Item Number and Quantity.
- Click Save after you enter each item.
Note: On an Inventory or Order Guide Quick Issue, you can designate non-file, non-stock, or direct delivery lines as Separate PO by Requisition. (This designation is useful when requesting capital project items.) Requisition lines specified as Separate PO by Requisition are entered on one or more separate POs by vendor. See Separate POs by Requisition.
-
Select Finish Now or Finish Later.
- The requisition is created and appears on the Requisitions list.
- If you select Finish Now,
the system asks you to confirm that you wish to submit the requisition, and
gives you the opportunity to build and print the pick list.
- To build a pick list immediately, select Create
Pick List.
- To print the pick list as well, select Print
Pick Document.
- Click Submit.
If you have chosen to build a pick list, a message
appears with the pick list number. If you have also chosen to print the
pick list, a formatted version appears. Select the printer icon to print
the pick list on your local printer.
Items on the requisition are either issued
or backordered.
Note: Depending on how your approvals
are configured, requisitions created by Quick Issue may remain in Pending
Approval status, and will require user intervention. See Requisition
Approval Processing by Cost, Commodity Code and Item Type.
- With Finish Later, the system displays the Inventory
Quick Issues list. Click Refresh. Your new Quick Issue batch appears
on the list. You can come back to it at another time and finish it.
- Select Return to Quick Issue
Batch to finish creating your Quick Issue batch.
- Select Finish Now.
Copyright © 2023 by Premier Inc. All rights reserved.