Par Level Replenishment Version
Contents
Overview
Most hospital
departments maintain a small local inventory of standard items that they use
all the time. The hospital distribution staff restocks each department's supplies
on a regular schedule. The local supply area, shelf, or closet--whatever it
may be--is a par location or par cart. The quantity of each item
to be kept on hand in the par location is the par quantity or par
level. As items are used, they are replenished up to the par
level defined for each item. In this way, quantities of local supplies are kept
constant.
You can implement online par level replenishment of supplies for your site.
You can create par carts, view the contents
of each par cart, modify par cart contents, or create a new cart. You
can establish par cart groups and view the par carts that belong to each group.
The sections below explain how to set up
your site for par carts.
Par cart replenishment involves creating
requisitions for par cart items.
Requisition Par Cart Items explains how to open a par cart requisition
manually.
If your site uses the Mobile ERP application on the iPad
to manage supplies, you can use it to count par items. With the mobile application, requisitions
are automatically created. You visit par cart locations to scan each item
and record the current quantity. When you are finished scanning items, you
upload the information to the system. The system compares actual item quantities
to par levels established for each item, and generates requisitions to replenish
items as needed up to their par levels. Your materials organization sets
up a schedule to identify which par carts are counted on each day of the week
so that the appropriate information is downloaded to the iPad mobile application.
Detailed information about par cart scheduling, along with some typical questions is in
Par Cart Hours Delay Between Issues.
Mobile Applications on the iPad
If you are an iPad user, documentation for par level replenishment is available from the Quick Start Guide on the iPad.
Financial Reporting Fields
Your site may be set up to use Financial Reporting Fields in various parts of the application. Similarly, you may also be using Project Codes and Fund Codes.
Financial Reporting Fields, along with Project Code and Fund Code let you generate reports on non-account code fields. For example, your site might define Physician as a financial reporting field. Users could then select the physician associated with a par cart, for example.
If financial reporting fields are used by your site, the tab Fin Reporting appears on the panels. (Otherwise, this tab does not appear.) You can enter field values on the tabbed panel.
Details are in Using Financial Reporting Fields in ERP.
Security
To access organization, department, or asset location data, the organization, department, or asset location must be included in a user's data profile.
- The "Requisitions" role object controls access to requisition creation, display, copying, and editing. The Create setting allows users to create a new par cart requisition.
- Displaying the list of par carts and the contents of any par cart requires the "Ordering" role object setting of View. To create a par cart, the setting must be Create.
See Work with User Roles for details on roles and role objects.
To
create a new par cart:
- From
the Materials Management main Contents, click Warehousing > Par Carts
- All Locations. The list of par carts appears; or, No Data appears
if no par carts have been defined.
- Click
New. The Par Cart header panel appears (Figure 1).
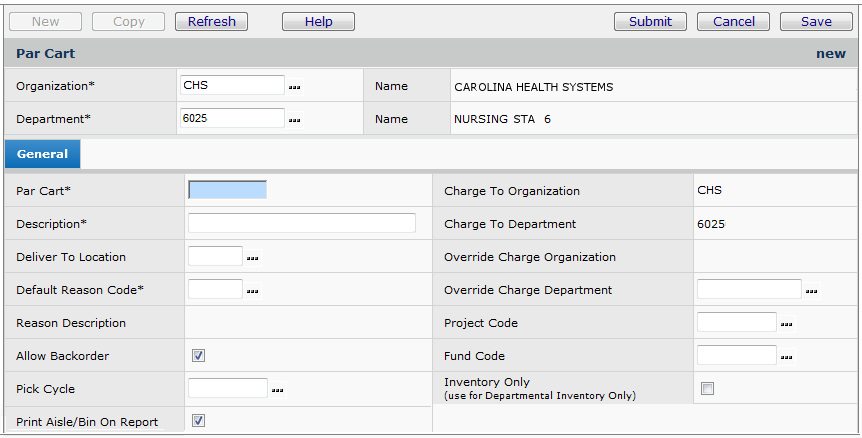
Figure 1 - Create a New Par Cart: Header
- Complete
the required fields: Par Cart, Description, and Default Reason
Code.
- Click
Submit. If there are no errors, the Par Cart panel is refreshed,
and the Department Item Inventory list appears at the bottom
of the Add Items to Par Cart panel.
- On the Department Item Inventory list, click the box under Select Item to
choose each item for the par cart.
If your site uses
cross-organizational processing, the list may show an item supplied
by more than one Supply Organization and / or Supply Asset Location.
- Click
Submit. The panel refreshes again, and Par Cart Lines appear at the
bottom, with the items you selected (Figure 2).
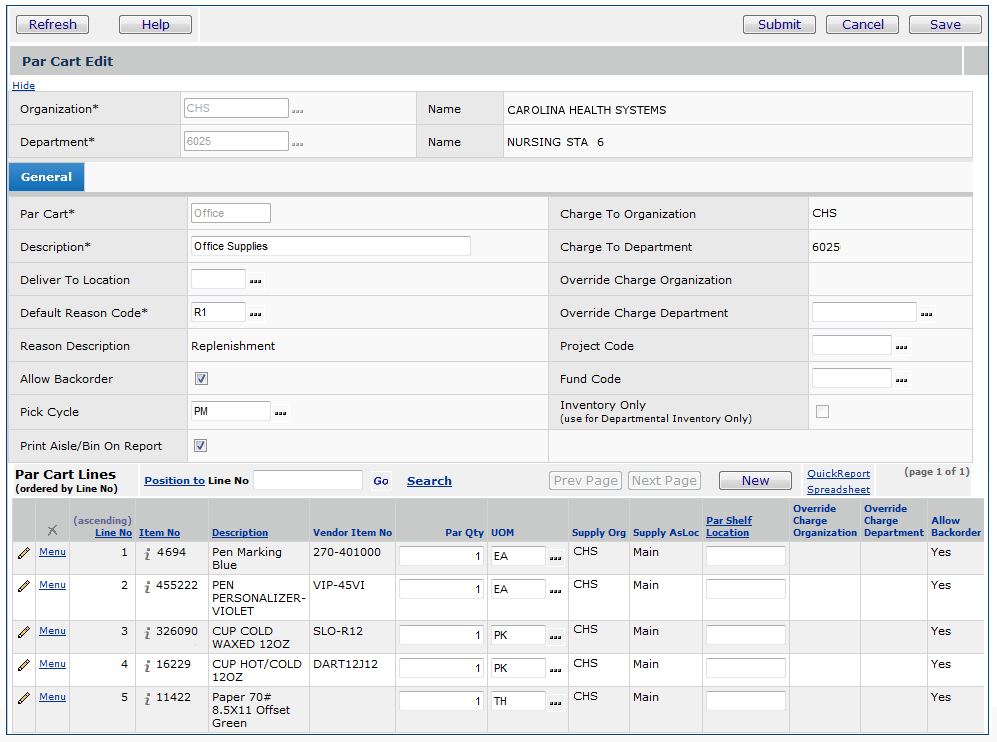
Figure 2 - Create Par Cart: Enter Par Level Quantities
- Enter
the par level quantity in the Par Qty field for each item.
- Verify
the unit of measure in the UOM field. Change the UOM
if needed.
- Enter
the Par Shelf Location.
- Click Submit. The Par Carts list appears again. Click Refresh
to view your new par cart on the list.
To
view par carts and their contents:
- From the Materials Management main
Contents, click Warehousing > Par Carts - All Locations. The list
of par carts appears
- Locate the par cart that you wish
to view.
- Click i (inquiry) to see
a general description of the par cart and the par cart lines (Figure 3).
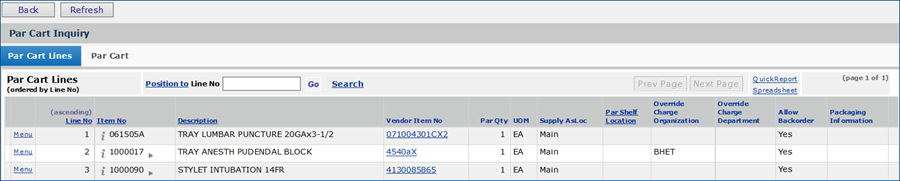
Figure 3 - Par Cart Inquiry Panel
To edit an existing par cart:
- From
the Materials Management main Contents, click Warehousing > Par Carts
- All Locations. The list of par carts appears.
- Locate
the par cart that you wish to edit and click the pencil icon or select
Menu > Edit. The Par Cart Edit panel appears. See Figure 2.
Note: You can also print out the par cart information by selecting Menu >
Print Par Cart.
- Make
changes as needed on the edit panels.
Some lines may have a small arrow next to the
item number. Clicking the arrow takes you to a tabbed panel. From the panel, you can view an
item picture, an MSDS, or contract information for the item.
- When
you are finished editing, click Submit. The system displays the par
carts list.
To view par cart groups:
- From
the Materials Management main Contents, click Warehousing > Par
Groups.
A list of par cart groups appears (or No Data if no groups exist).
- Select
Menu > Par Carts in Group next to a group name to view its par
carts.
You can also edit (Menu > Edit) or delete the group.
To
create par cart groups:
- From
the Materials Management main Contents, click Warehousing > Par
Groups.
The Par Groups list appears (or No Data if no groups exist).
- Click
New. The Par Group panel appears.
- Enter
a name for the par group in the Par Group field. Enter a description
in the Par Group Description field.
- Click
Submit. The system creates the par group.
- Refresh
the Par Groups list. The new par group appears.
- Next
to the new par group, click Menu > Par Carts in Group. No
Data appears.
- Click
New. The Par Group edit panel appears.
You will
use this panel to assign par carts to the par group, and to set up a schedule
for counting and replenishing items on each par cart.
- Select the Department and Par Cart
from the prompts (...).
- The system assigns 1 as the Par Cart Sequence
number for the first par cart in the group, and automatically adds one to
each par cart that you add to the group. You can enter a number other than
1 to start the sequence, if you wish. The sequence determines the order in
which the par carts are visited and their items counted.
- Select the days of the week when the par cart's
items should be counted and replenishments requisitioned. If you are using
the iPad mobile application to count par items, the par cart's item records are downloaded
to the on the days that you specify.
- Click Submit. The system displays the
list of par carts in the group. Click Refresh to see the par cart
listed.
- Click New to add another par cart to
the group.
- Repeat steps 7 to 12 until you have finished
adding par carts to the group.
- When you are finished creating the par group, click Submit.
The system displays the Par Groups list.
You can view par cart item information in the system
after you have uploaded it from the mobile application. For each update, the system processes
the data, importing it into its item records and creating requisitions.
To view imported par cart item information:
- From the Materials Management main Contents, select
Warehousing > Par Cart Imports.
The Par Cart Imports list appears The list shows import files, each with an Import ID and Import Date. The import files contain items that
need to be requisitioned to replenish par levels by department.
- Click Menu > View Import Details next to an Import
ID to view the items that were imported into the system in that file
on the Import Date. A list of items on the par cart appears. The
list shows the Par Level and the current On Hand quantity
(if any) of each item.
- Click View Errors to view problems importing
any file.
To view requisitions created from imported items:
- From the Materials Management main Contents, select
Requisitioning > Requisitions - Current Dept or Requisitions
- All Depts. The Quick Click menu appears.
- Next to Advanced Search, click Search.
The Search panel appears.
- In the Search Words field, enter: Created
from Requisition Import.
- Click the down arrow in the box next to the
Search Words field and select Exact Phrase.
- Click Submit.
The Requisitions list appears. For each requisition, the
Description field contains: Created from Requisition Import.
Override Charge Department on Requisition Lines
A requisition created from a par cart/order guide will use the Override Charge Department field for an item specified by the order guide/par cart line.
When an item is added to an order guide or par cart, the Override Charge Department field will be populated according to the information in the header. However, this information can be deleted or changed.
If the order guide or par cart line contains no Override Charge Department value for the item, a requisition created from
the order guide or par cart will utilize the Override Charge Department from the item inventory.
To print par cart labels:
Par cart labels print on Avery
5261 Laser labels, or on any laser label stock that
is 1"X 4", with 2 labels across and 10 down. See Printing Labels for setup details.
- From the main menu, select Warehousing > Par Carts - All Locations.
The list of par carts appears.
- Locate the par cart for which you wish to print labels.
- Select Menu > Print Par Cart Labels.
The system sends you a message that the labels are being printed, and
that you can access them from Reports > My Archived Reports.
Reports on Par Cart Requisitions
On the File Items Transactions list (Figure 4) or Non-File Items Transactions list, the column Requisition Reason Code can be used to filter the list for requisition transactions with a selected reason code. For example, you can filter the list for par cart requisitions if you define a Reason Code (such as PC) and assign it to one or more par cart records. Filtering the list of transactions for PC (in this case) displays the requisitions (Figure 5).
- To access the Inventory Transactions list for file items, from the Materials Management main Contents, select Inventory > File Item Transactions.
For non-file items, select Inventory > Non-File Item Transactions.
- Filter the list by the Requisition Reason Code column, if you wish.
- Click Quick Report to get a printable version of the filtered list.
Note: If you would like to print the aisle/bin number on the report, then select the Print Aisle/Bin On Report checkbox located on the General tab of the par cart record.
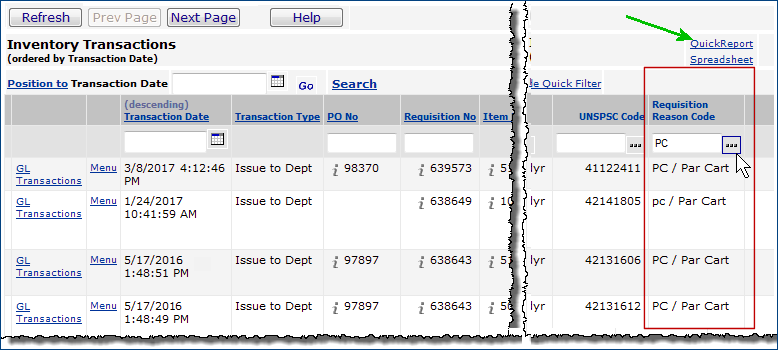
Figure 4 - Filtering the Inventory Transactions List for Par Cart (PC) Requisitions
On the "Inventory Transactions (File Items)" and "Inventory Transactions (Non-File Items)" report objects, the fields Reason Code Req and Reason Desc Req can also be used to select requisitions for reports.
- To create and run report definitions, from the Materials Management main Contents, select Reports > My Report Definitions.
- Click New to create a new report.
When you create a report definition with either of the "Inventory Transaction" report objects, include the field Reason Desc Req (and/or Reason Code Req). (See Figure 5.) Then, to report only on par cart requisitions, make the Reason Code Req field a selection field, and set its value to whatever you assigned to par cart records. (In the example, this value would be PC.)
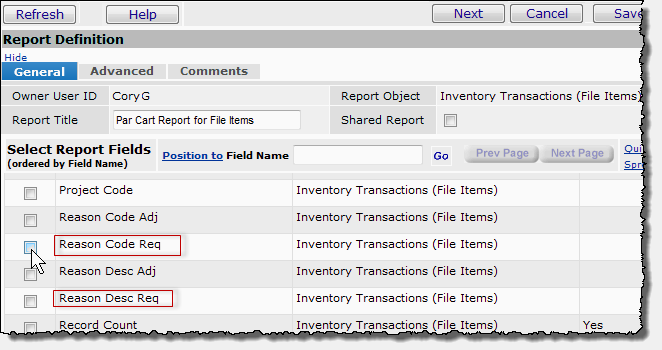
Figure 5 - Selecting Reason Code Fields for a Par Cart Requisition Transactions Report
See Reason Code Tables to define different types of reason codes.
Here is how to add a Reason Code to a par cart record.
- From the Materials Management main Contents, select Warehousing > Par Carts - All Locations.
- Locate and edit the par cart record(s) of interest. The Par Cart Edit panel is in Figure 6.
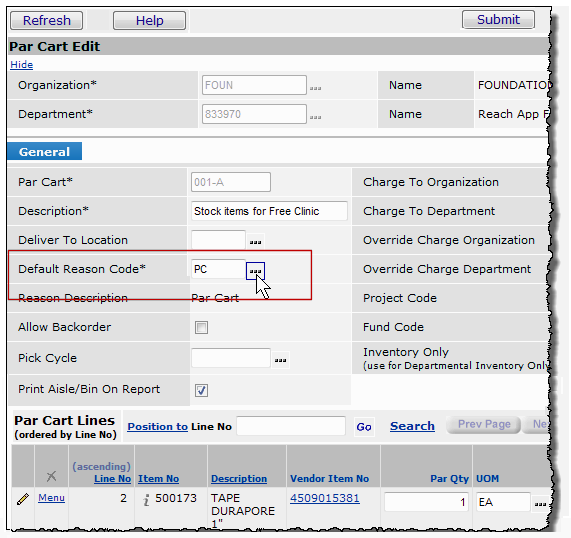
Figure 6 - Par Cart Edit Panel: Select a Reason Code
- On the edit panel, click the prompt for Default Reason Code and select a reason code. For example, if you have defined the Reason Code PC in your reason codes table, select it. Any requisitions created from the par cart will display the Reason Code and Reason Description assigned to the par cart.
Optimizing Par Levels
ERP Materials Management contains tools that analyze par item usage and calculate optimal, recommended par levels. Based on historical data, the system compares existing par levels to potential future levels. The difference is expressed as a percent variance.
In generating recommended par levels, the system uses frequency of replenishment, safety stock quantities, and usage over a period of time. You can create recommendations for selected departments and par carts in an organization, or for all. Recommendations are displayed by priority, and sorted by the change in recommended levels. (Calculations are outlined below).
Once a par level recommendation set is available, you can work with it to try out different scenarios. For example, you can manually change recommended par quantities and display resulting variances. You can also change the time frame and/or the count frequency for usage analysis. When you have accepted the recommended par levels, or adjusted the recommendations to your liking, you Finish the job, and the system applies the new levels to the selected par carts.
A new report object "Par Level Recommendations" is also available for writing report definitions.
Security
- To run par level analyses and recommendations, the security role object "Ordering" for a user's role must be set minimally to Modify.
With the setting View, the user cannot edit or create par level recommendations, but only inquire on those already created.
- The user's data profile must allow access to data for the organizations and departments of interest.
Analyzing and Adjusting Par Levels
The following steps will guide you through the tools to generate new, recommended par levels, and adjust your current par levels as needed.
- Create a par level analysis and recommendation job.
- Review the recommendation results.
- Accept recommended par quantities and/or make adjustments.
- Mark the job as completed.
Creating a Par Level Analysis/Recommendation Job
The following data is your initial input to each recommendation job:
- Organization: The organization that the par level recommendation job belongs to. Recommendations are generated by organization.
- Departments: The departments whose par carts are analyzed in the job. A search and select feature is available.
Only departments allowed by the user's Data Profile are available.
- Par cart identifiers: Codes assigned to the par carts for which analyses and recommendations are made.
- Usage dates: The time period for which par car item usage is analyzed. Calendar prompts let you select the date range.
- Counting frequency: The number of times for each week (in the specified time period) that the system should look at par level data. This value is an integer from one to seven. The system uses this value in its calculations to identify the number of days between counts.
To create a par level optimization job:
- From the Materials Management main Contents, select Warehousing > Par Level Recommendations.
A list of par level recommendation jobs appears, if any have been run.
- Click New.
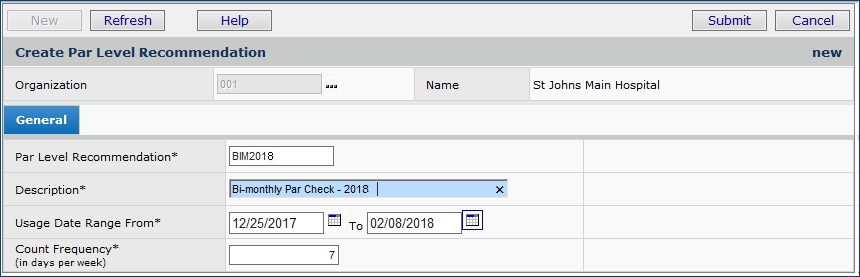
The "Create Par Level Recommendation" page appears (Figure 7). This panel is the job header.
Figure 7 - Header for a Par Level Optimization
- On the "Create Par Level Recommendation" page General panel, enter values as follows:
- Organization: Click the prompt to change the organization. The default is the Current Settings organization.
- Par Level Recommendation: Enter a code or shortcut identifier for the optimization job.
- Enter a Description.
- Select a Usage Date Range (click the calendar icons). The panel displays initial default values.
- Accept the default Count Frequency of 7, or enter a value from 1 to 6.
- Click Submit.
The "Par Level Recommendations - Selections" page appears (Figure 8).
Use the panels on this page to identify the par carts (for various departments) that you wish to include in the optimization job.
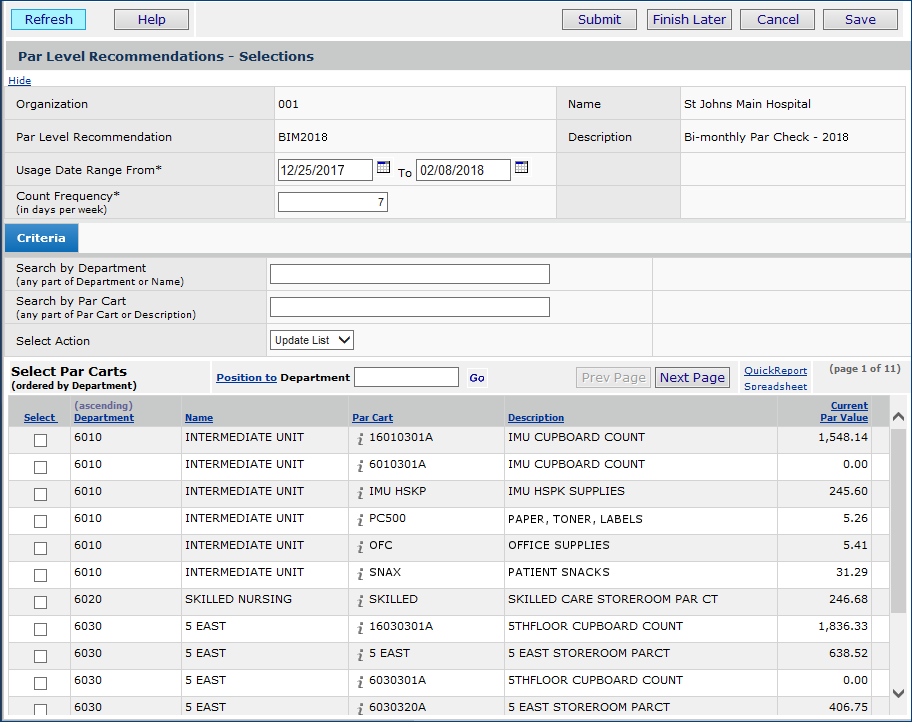
Figure 8 - The Par Level Recommendations Selection Panel
- Use the Search fields to locate departments and/or par carts of interest to select. Figure 9 is an example of a search for a department. The user has selected several of the department's par carts for analysis.
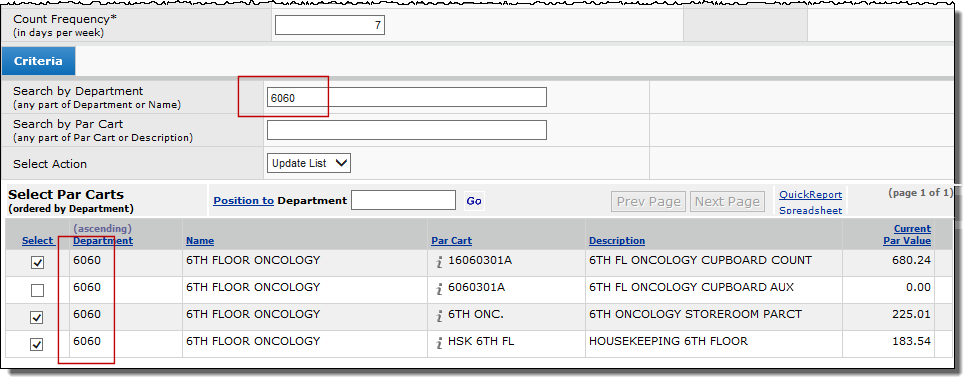
Figure 9 - Selecting Departments for Par Level Recommendations
Criteria Panel Tools
- In the center of the panel (Figure 9),
- In the Search by Department field,
enter any characters from a department code or name.
- In Search by Par Cart, enter any characters from a par cart code or name.
- In Select Action, choose the action that the system should perform on the list in the lower part of the panel.
Actions are:
Update List - Searches for the values entered in Search for Department and Search for Par Cart; then, displays the search results in the list at the bottom.
Select All - Selects all departments and par carts in the list.
Alternately, you can select individual departments and their associated par carts by clicking the Select boxes.
Unselect All - Removes the check from Select boxes for all departments/par carts previously selected.
Show All - Removes the search values and refreshes the Select Par Carts list to show all par carts.
- Press Enter (or Save) to apply the action.
- Click Save to save the selections.
- Click Submit.
The system returns to the list of par level recommendations jobs. The recommendation job that you submitted runs (in async mode; that is, "in the background").
- Click Refresh to display the job status. When the job finishes running, its Status is In Progress.
- Click edit or the edit icon
 to open the recommendations panel.
The "Par Level Recommendations - Par Leveling" page appears (Figure 10A). This panel contains the recommended par levels and shows variances between currently-assigned levels and the suggested levels. You will want to review, and possibly adjust the quantities on this panel.
Reviewing the Par Level Recommendations Panels
Figure 10A is an example of the "Par Level Recommendations - Par Leveling" page.
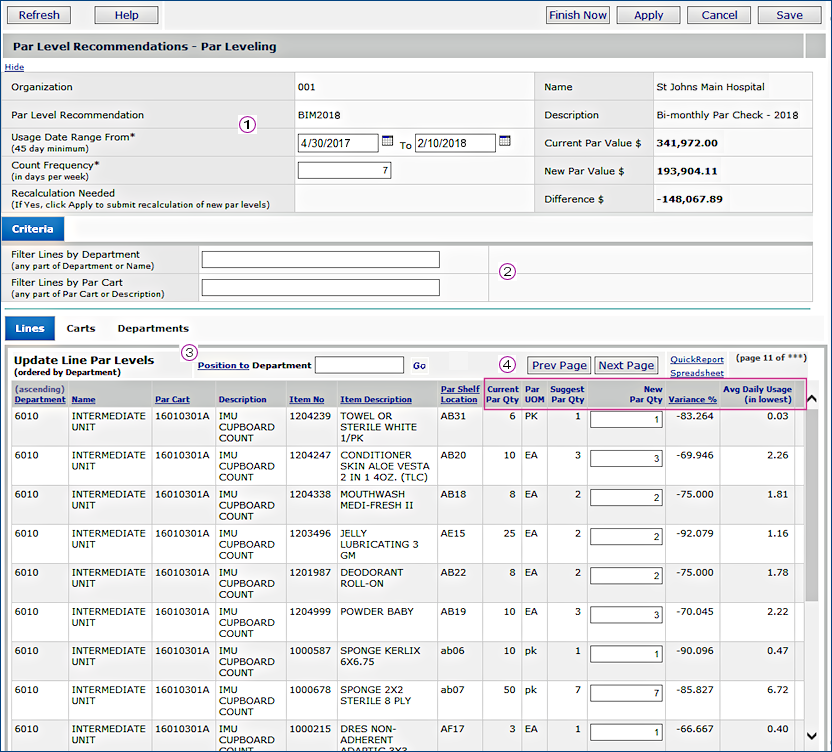
Figure 10A - Par Level Recommendations/Par Leveling Page with Lines Tab
 The top panel (Figure 10A, left side) contains the Usage Date Range and the Count Frequency values that the user entered.
Total dollars for the current par levels (current quantities), the new par values (recommended quantities), and the total dollar difference are on the right.
Notes:
- You can change the Usage Date Range and/or the Count Frequency and recalculate recommendations for the departments/par carts selected. Examples are below.
- Hide closes the top and middle panels, and displays only the bottom panel. Show reopens hidden panels.
 In Figure 10A, the center panel - Criteria - filters the item lines on the bottom by department and/or par cart.
- To use the filter, enter characters from the department code or name and/or the par cart code or name in the appropriate field.
- Click the Enter key.
-
The data on the Lines panel changes accordingly.
-
The header values at the top for Current Par $, New Par $, and Difference $ change to match the filter selections. The Carts and Departments panels also respond to the filter.
 The bottom panel (Figure 10A) has several sections: Lines, Carts, and Departments.
Lines displays all the par cart lines in the recommendation set. Each line contains
- the department, par cart, item number, and item description.
 Continuing in Figure 10A,
- the currently assigned par quantity and its associated UOM -- Current Par Qty and Par UOM.
- the recommended quantity -- Suggest Par Qty -- based on the system's analysis of item usage over the time period.
- the new par quantity -- New Par Qty -- that the system will assign to the item when you Finish the recommendation job. You can edit this value to assign a par quantity different from the system-generated quantity.
- the Variance % -- the percent of change in dollars between the current and suggested quantity.
- average daily usage for the time frame specified.
Calculations are described in a subsequent section.
Figure 10B is the bottom of the "Par Level Recommendations - Par Leveling" page open to the Carts panel. This panel displays data for each par cart in the set of recommendations. The values Current Par Value, New Par Value, Variance Amount, and Variance Percent are totals for each par cart.
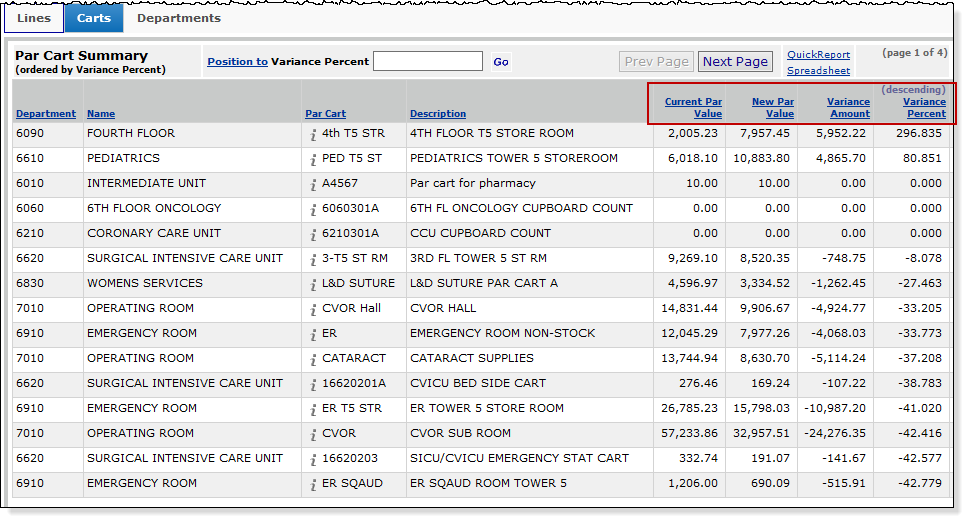
Figure 10B - Carts Tab on the Par Level Recommendations/Par Leveling Page
Figure 10C is the bottom of the "Par Level Recommendations - Par Leveling" page open to the Departments panel. This panel displays total data for all of the par carts in each department selected for the recommendation job. The values Current Par Value, New Par Value, Variance Amount, and Variance Percent are totals for each par department.
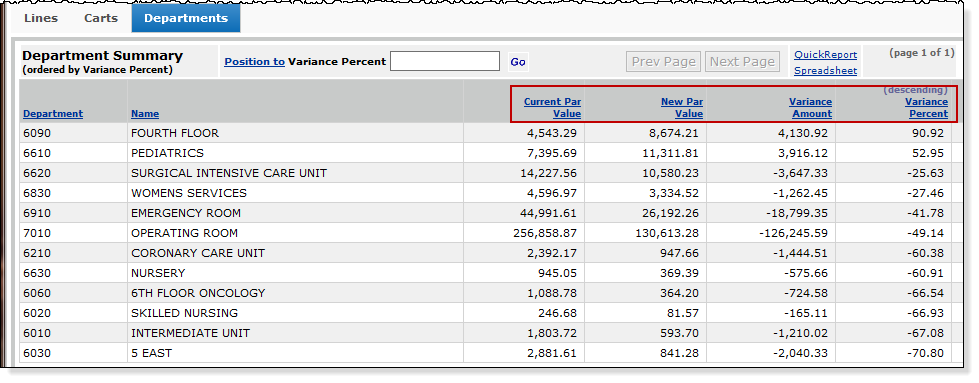
Figure 10C - Departments Tab on the Par Level Recommendations/Par Leveling Page
Interpreting Recommendation Results
Figure 11 is a set of par level recommendations that the user has created. The set of recommendations is open to the Lines. Each item for all the selected departments and par carts is listed on this panel, with its recommended levels. (The list of items and recommendations may have multiple pages. Figure 11 is a sample page.)
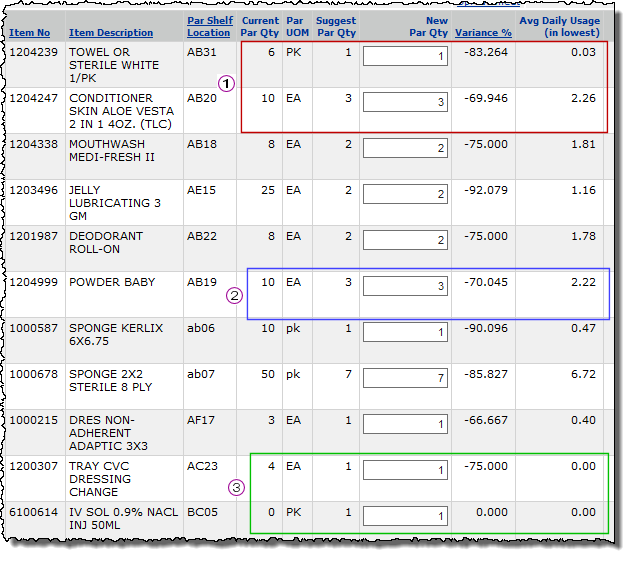
Figure 11 - Par Items with Par Level Recommendations
Reviewing the data on Figure 11, we observe the following;
For the first item, the current par level (Current Par Qty) is 6 PK. However, Avg Daily Usage over the time frame specified is only .03 -- less than one. This data clarifies that the item is being used, but not very much, and is certainly not being depleted at the current par level. When a usage value is less than one, the system takes "1" as the most effective par quantity. The recommendation for this item is to change the par quantity (Suggest Par Qty) to 1.
The second item has a current par level of 10. The usage is 2.26. The system rounds its recommendation from the usage amount up to 3, and that is the New Par Qty.
This item is similar to the second item: the par level is 10, and the system recommends 3. The current usage is 2.22, rounded up to 3 to get the New Par Qty.
The last two items are similar. One item has a current par quantity of 4, but usage is zero. Similarly, the second item has zero par quantity assigned, but a usage value of zero. The system sets zero usage quantities to a New Par Qty of 1.
Adjusting Recommended Quantities; Changing Usage Period Range and Count Frequency
Once the system has generated par usage data and new, recommended quantities for the departments and par carts that you identified, you can change several values in the recommendation if you wish to review different data, or set different par values.
- You can change values for an item's New Par Qty. Initially, New Par Qty is the same as the system's recommendation (Suggest Par Qty), but you can set New Par Qty to a different amount, if you wish.
- You can specify a new Usage Period Range if you wish to review data for a different time frame.
- You can specify a different Count Frequency.
Important: When you change the Usage Period Range or the Count Frequency, the system may need to recalculate. If so, a field on the "Par Level Recommendations - Par Leveling" top panel -- Recalculation Needed (Figure 16) is Yes. See the recalculation instructions below. When you recalculate, any changes that you made in the New Par Qty fields are preserved, and lines with those changes do not get recalculated.
Changing Recommended New Par Quantities
- To change the New Par Quantity on the Lines panel, enter the new quantity and click Save.
The quantity is changed, and the Variance % is updated.
The item in Figure 11 has a suggested par quantity of 3. In Figure 12, the user has changed the New Par Quantity to 2 and clicked Save. The system computes the new Variance % as -79.555 (from -70.045).

Figure 12 - Changing a Recommended Par Quantity
In Figure 11, the item with a par quantity of zero has a recommended quantity of 1, even though this item has no usage. The user has edited the New Par Qty field and set the quantity to zero (Figure 13). (This item also might be a candidate for removal from the par cart.) The Variance % is still zero.

Figure 13 - Changing a Recommended Par Quantity to Zero
Changing Count Frequency and/or Usage Dates Range
In Figure 10A, recommendations for Count Frequency of 7 over a ten-month period are displayed. Imagine that the user would like to run recommendations using a lower Count Frequency -- 3 as in Figure 14. (The user did not change the Usage Date Range, but could have, either additionally, or instead of the Count Frequency.)
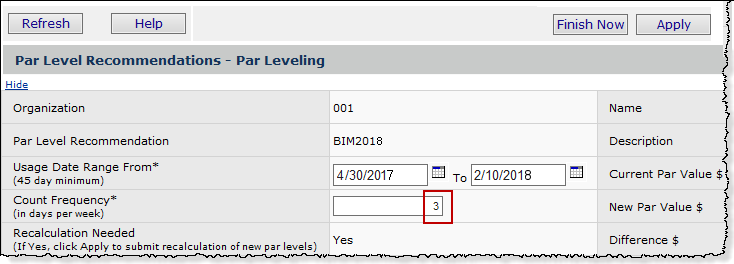
Figure 14 - Changing the Count Frequency
After entering the new Count Frequency, the user instructed the system to recalculate recommended par values and variances. The result for the first few items is in Figure 15. Compare the Suggest Par Qty and Variance % values for the first three items in Figure 15 and Figure 11.
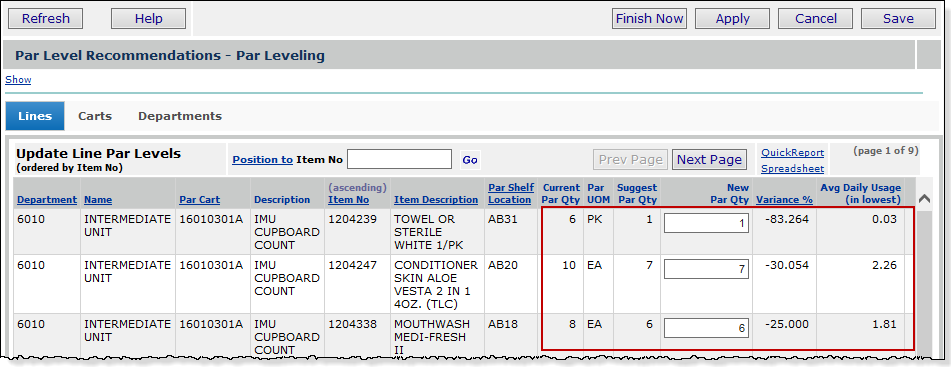
Figure 15 - Results of Changing Count Frequency and Recalculating
Recalculating
When you change the Usage Period Range or the Count Frequency, the system usually needs to recalculate. The Recalculate Needed field (on the top panel, Figure 16) is Yes.
Note: The system will not let you complete a par level recommendation job if the Recalculation Needed flag is Yes .
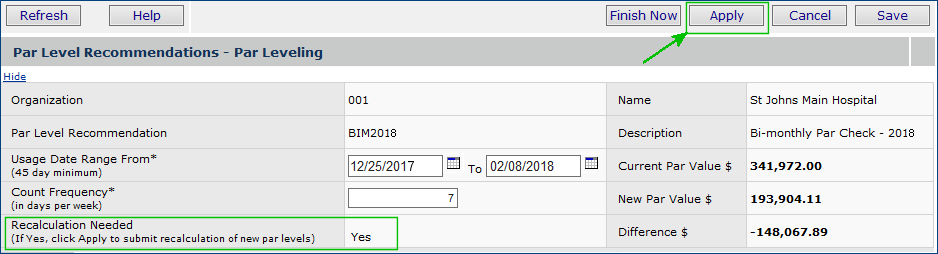
Figure 16 - Recalculation Needed
To recalculate
- On the top right of the "Par Level Recommendations - Par Leveling" page (Figure 16) , click Apply.
Clicking Apply closes the page and returns to the recommendations jobs list. The system displays messages to indicate that the recalculation job is running.
- Click Menu > Edit to re-open the"Par Level Recommendations - Par Leveling" page to display the adjusted quantities and variances.
Recalculating from the Recommendations List
You can also recalculate a set of recommendations from the Menu on the list of recommendation jobs (Figure 17). This menu option is only enabled when the Recalc Needed field is Yes because you made Usage Period Range or Count Frequency changes.
- Next to the job of interest, click Menu > Recalculate.
Figure 17 - Recalculating From the Par Level Recommendations Menu
The Recalculation Par Level Recommendations confirm panel appears (Figure 18). Note that on the panel, you can change several parameters to produce a recommendation based on a different time frame and count.
- Click Yes.
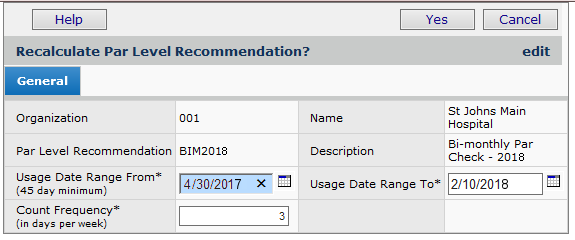
Figure 18 - Confirming Par Level Recommendations with the Option to Reset Parameters
When recalculation is finished, the Recalc Needed field is blank. You can review any new recommended quantities and variance percents.
Completing a Par Level Recommendation Job
- To complete a par level recommendation job, from the "Par Level Recommendations - Par Leveling" page, click Finish Now (Figure 19).
The system sets the items' par levels to the values in the New Par Qty fields and closes the edit panel, returning you to the recommendations list.
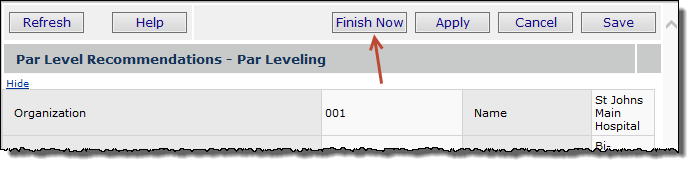
Figure 19 - Finishing a Par Level Recommendation Job
Formulas Used In Calculations
Calculations used in par level recommendations are below.
Average Daily Usage
Average Daily Usage = Qty / Usage Days
Qty = Sum of Inventory Transaction quantities for a given requisition line linked to the par cart Line for the selected Usage Date Range.
Usage Days = # Days between the From and To date on the Usage Date Range indicated on the Par Level Recommendation header.
New Par Quantity
Recommended Par Level = Daily Usage * Number of Days in Between Counts
Number of Days in Between Counts is calculated as:
Count Frequency
specified on header: |
Number of Days Between Counts = |
| 7 days a week |
1 |
| 6 |
2 |
| 5 |
2 |
| 4 |
2 |
| 3 |
3 |
| 2 |
4 |
| 1 |
7 |
Par levels are rounded to the nearest UOM. Suggested par quantities are always in the current (existing) par UOM.
Variance
Variance is based on items' dollar values, not quantities. Variance is rounded to three decimal places.

Importing Par Cart (and Order Guide) Lines into ERP
You can import par cart and order guide data to ERP to create new par cart and order guide lines for subsidiary organizations and departments. Administrators can control who has access to this feature with a security setting.
The first step is to export existing par cart/order guide lines to an Excel worksheet. A new panel is available for the export task. Then, using the worksheet as a template, make changes as needed to par cart/order guide lines, or add new par carts/order guides. Save the worksheet as a .csv file, and finally upload it to the application.
The upload is the standard upload process. A panel lets you work with uploaded par cart/order guide line files.
The following steps upload lines from a par cart (or order guide).
- Export data from an existing par cart or order guide.
From the Materials Management main Contents, select Imports/Exports and Financials > Order Guide/Par Cart Lines.
The Order Guide and Par Cart Lines panel appears (Figure 20).
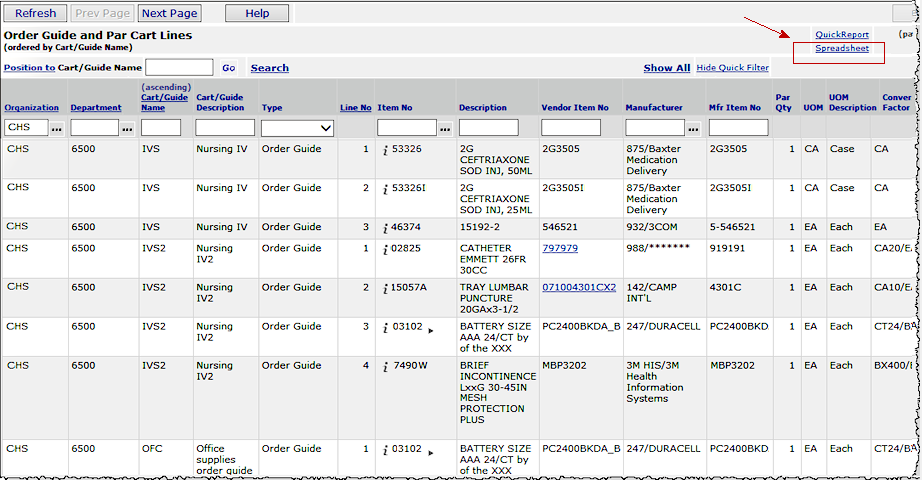
Figure 20 – The Order Guides and Par Carts Lines Panel for Exporting
This panel displays a consolidated list of all par cart and order guide lines filtered for the department in your Current Settings.
- Use the Quick Filters – the white boxes at the top of each column -- to set the list to par carts and order guides for the organization/department of interest.
- Click the Spreadsheet link (Figure 20, red arrow, upper right).
Windows displays download and security information. The export file opens in Excel.
Note: You will need to save the file as a .csv file for the export.
Figure 21 is an example of the worksheet filtered for order guide IVS.

Figure 21 – Sample Order Guide/Par Cart Downloaded Worksheet
-
Using the exported file as a template, edit worksheet column values to change or delete existing lines, to add new lines, or to add a new par cart/order guide with new lines.
The first column -- Action -- contains the action that the application should perform. Enter an action:
A - New line. Add a line to the order guide or par cart identified in Columns E and F .
D - Current line: delete the line from the par cart/order guide.
C - Current line: update the line.
Leaving the Action column blank
(no code entered) causes an error.
- In Column B, be sure that the Type is Cart for a par cart. (Guide is the value for an order guide.)
-
You can enter a new department and organization for a new par cart/order guide in columns C and D.
To create a new line or an entire new par cart/order guide: On the worksheet, insert rows ahead of the EOF marker, or blank out existing columns and enter new values.
Columns E and F are the order guide/par cart code and description. If you are uploading lines for a new order guide/par cart, enter the new code and description here.
The remaining columns G through N are for par cart/order guide line data. You can edit these columns to change existing lines, or add new lines.
- EOF must be the last data element in the worksheet.
- Save the worksheet as a .csv file to a local network location.
- Import the .csv file that you saved on your network to the application.
- From the Materials Management main Contents, select Imports/Exports and Financials > Order Guide/Par Cart Imports.
The Order Guide/Par Cart Imports panel appears (Figure 22). This panel lists uploaded files and helps identify errors. See the panel Help for details.

Figure 22 – The List of Order Guide/Par Cart Imports
Duplicate Lines on Par Cart Imports
Hospitals sometimes need duplicate items on order guide/par cart imports when, for example, supplies for the same item are located in different storage areas in a department. Duplicate items are allowed on par cart/order guide imports. The application issues an information message when a duplicate item is processed on import.
Important: On the import, set the Line Number of the duplicate item to zero or to another number value that does not exist in the set of lines; in other words, the duplicate item must have a unique Line Number.
To view the message,
- Next to the import on the Imports List, select Menu > View Import Details. The lines appear.
The duplicated line will have Yes in the Message column.
- Click Menu > View Messages.
Security
This feature is controlled by the role object "CartGuideLinesAdmin." The initial security setting for this role object defaults to None. Displaying the Order Guide/Par Cart Imports and Order Guide/Par Cart Lines list requires a minimum security level of View.
Use a Mobile Device for Par Counts
If your site uses the ERP Mobile applications, you have the ability (assuming your User Profile settings allow it) to do par counts on the mobile device.
To open your mobile device (iPad or Android-based tablet) for counting par cart item, on the Main contents, tap Supply Chain > Orders > Par Carts.
Copyright © 2023 by Premier Inc. All rights reserved.