Set Up and Maintain EDI Vendor Relationships Version
Contents
Overview
The EDI (Electronic Data Interchange) feature lets hospitals exchange
EDI transactions with vendors. Vendor information and medical center ("customer")
information must be set up for EDI processing.
The system maintains an administrative database of vendors who currently have
EDI enabled for various document types (e.g., EDI 850, EDI 810). To exchange
EDI transactions with one of these vendors, a medical center's information for
a vendor in its database must be associated with the EDI information
for the vendor in the database. A medical center site can perform
this association, after discussion with the vendor to obtain the relevant EDI
setup data.
Security
EDI setup features are generally controlled by the role object "EDIAdmin." Editing EDI vendor relationship records requires the minimum setting of Modify. Other activities such as deleting vendor relationships require the setting All.
Hospital accounts on the vendor relationship records are controlled by the role object "Vendors." The setting to display hospital accounts is All.
The role object "VendorsMM" controls display, creation, copying, and editing of vendor EDI buy from location records, except for buy-from locations' representatives, which is controlled by the role object "BuyFromLocReps." Security settings depend on the action; for example, to delete a record, the "VendorsMM" setting must be All. To modify a record, the setting must be Modify.
Using this Topic
This topic has a companion document: EDI Purchase Orders,
Confirmations, and Invoice Matching. The companion document explains how
to send EDI purchase orders, view a purchase order's acknowledgment status,
import EDI 810 invoices, and process EDI invoices.
Some setup steps will also need to be performed by the Solutions Center staff. Be sure to contact them if you are planning to use EDI for the first time.
EDI Transaction Document Formats
The ANSI X12 committee creates formats for the different document types used
in Electronic Data Interchange (EDI). ANSI publishes each document format as
a standard. Standards for many documents types are available for use in different
industries. Many vendors use the published standards for the following
document types:
- Purchase order documents (EDI 850).
- Purchase order confirmations (EDI 855).
- Advance replenishment notices (EDI 856).
- Invoices (EDI 810).
- Vendor catalog imports (EDI 832).
- Payment documents (EDI 820).
A standard format for a document type contains information fields arranged
into several categories. An EDI purchase order (EDI 850), for example,
has the overall structure in Figure 1:
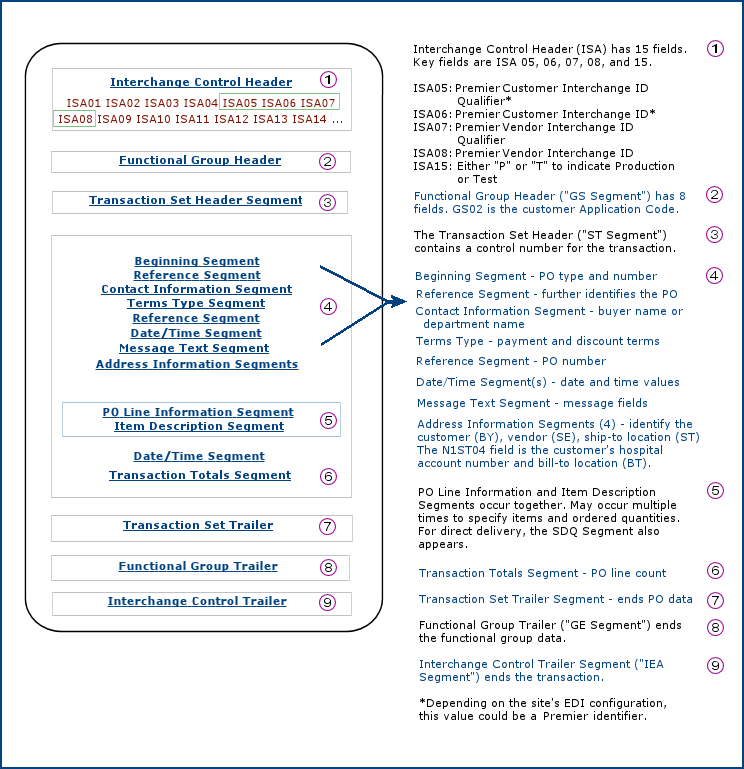
Figure 1 - Structure of an EDI 850 (Purchase Order) Document
The panels for setting up EDI vendor-customer relationships
(see subsequent sections) provide fields that are matched to fields on each
actual EDI transaction document. For example, in an EDI 850 document, the Customer
Interchange ID and the Vendor Interchange ID entered on the
setup panels are copied to the parallel fields -- ISA06 and ISA08, respectively
-- on the EDI document. The system enters the actual order information -- items,
quantities, and so on -- from the purchase order record into the EDI transaction
document. The PO information starts with the Beginning Segment and ends with
the Transaction Totals Segment.
EDI Vendor Setup Steps
The steps
in setting up a vendor for EDI processing are:
- Contact your vendor to obtain account numbers. You will use these numbers
to set up EDI in the system.
- Make sure the vendor record exists in your site's system database, and
that the vendor has associated items.(See To
add a vendor.)
- For a materials management vendor, the vendor record must include one
or more buy-from locations.
- If an asset location and/or a department has an account with a vendor
buy-from location, you use the account number on EDI transactions as a
shipping location identifier.
- Associate your vendor ID information (Vendor Name, Vendor
No) with the corresponding vendor in the system database.
- Enter your hospital ISA / account number for the vendor buy-from location(s).
- Assign vendor account numbers to asset locations and/or departments.
- Change the PO Transmission Method on the vendor buy-from location
record(s) to EDI.
Steps 2 and 6 are described in detail in Working with
Vendor Information -- Basics. The sections below describe Steps 1, 3, 4,
and 5. Users setting up Vendor EDI data must have authorization. Authorization
is established in the Role assigned in a User
Profile. To manage the EDI process, the assigned role must include the role
object EDI Admin.
About EDI Purchase Orders
How to create, authorize, and send an EDI purchase order is explained in To
create and send an EDI PO. The Purchase Orders list (Figure 2) provides
information about all of your purchase orders.
- To display the Purchase Orders list, from the Materials Management main Contents, select Purchasing > Purchase Orders (by PO) or Purchase Orders (by Create Date).
The list of POs ordered by PO number or by create date (as you selected) appears.
Note: The Purchase Orders list (Figure 2) has several
columns that can be searched using a Quick Filter: PO No, Asset
Location, Vendor No, Vendor/Location, Buyer, and others with underlined
column headers. See Note on Searching a List
or Using Quick Filters for an explanation.
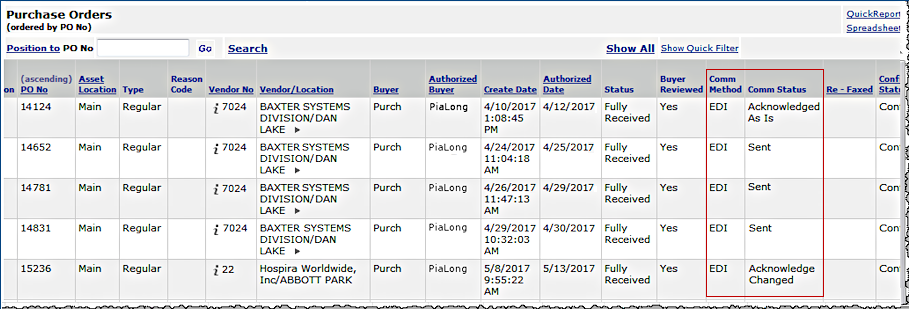
Figure 2 - Purchase Orders List Showing EDI Purchase Orders
Several columns on the list provide special information for EDI purchase orders.
- The Comm Method (communications method) column (in the red box) contains
the value EDI.
- The Comm Status (communications status) column indicates whether
the PO was sent, or not sent, and whether the vendor returned an acknowledgment,
with values as follows:
Sent - The PO has been sent.
Not Sent - The PO has not been sent.
Acknowledged As Is - The vendor has acknowledged the PO and there are
no problems or changes in any lines. The next action on the PO is shipping
by the vendor.
Acknowledge/Changed - The vendor has acknowledged the PO, and has noted
changes needed to one or more of its lines. Some lines may be rejected entirely.
The buyer needs to review the problems, and contact the vendor to resolve
them.
Rejected - The vendor has acknowledged the PO, and has rejected all
of its lines.
-
Confirm Status -
- For EDI purchase orders, the Confirm Status is set to Confirmed when a PO Confirmation Import is processed.
- The Confirm Status is set to Confirmed/Reviewed when the View EDI Confirm Exceptions menu option is selected from
the Purchase Orders list menu.
Notice in Figure 2 that PO 0804116 has not been authorized (or sent).
A purchase order must be authorized before it can be sent to a vendor using
EDI. You can authorize and send an EDI purchase order in one step, as discussed
in To create and
send an EDI PO. Or, you can authorize an EDI purchase order, and send it
at a later time. In Figure 2, PO 0804113 has been authorized, to be sent
later.
PO Export Status
On a different list - the PO Exports 850 list, you can get additional information about the status of PO exports.
Go to Materials Management > Imports, Exports and Financials > PO Exports.
A list of POs for export appears. These fields may be useful:
-
Extract
Status -
Extracted for Transfer: The PO has been
extracted from the ERP environment and exported, but not yet forwarded to the vendor.
Transmission Complete: The PO
has been extracted, exported, and forwarded to the vendor.
- To view detailed export information,
select Menu > View Exports. The following information is displayed:
Export Date - The date and time
when the PO was created as an EDI.
Export User - The user who sent
the PO.
Total Cost - The total cost of
the PO (for all lines).
Total Lines - The total number
of lines.
Extract Status - The extract status. See the panel's field help for values.
Message - Any relevant messages
or diagnostics.
Help contains additional details on the list fields.
Setup: Automatically Authorizing EDI Purchase Orders
EDI purchase orders can be authorized manually, or the system
can authorize them automatically for vendors that you specify.
To use automatic authorization, you create one or more scheduled jobs that run the authorization. You can assign a Scheduled Job Group identifier to buy-from locations, and set up jobs to authorize only POs from those locations. You can create multiple Scheduled Job Groups and scheduled jobs.
If you wish, you can set a delay in the auto-authorization process. The delay lets you make any last minute changes to a PO before it is authorized -- such as a correction in a quantity or unit of measure. For example, in a job that runs hourly, a delay of thirty minutes would auto-authorize only those POs created more than a half hour before the next job run.
Automatic authorization works together with the Vendor Order Cycle established
for a vendor buy-from location. For each purchase order to be automatically
authorized, when the auto-authorization job runs, the system looks for a Vendor
Order Cycle for the PO's buy-from location.
- If no Vendor Order Cycle is established, the system assumes "today" and authorizes the PO, unless there is a delay established. If a delay is defined, the PO authorizes in the next cycle after the delay has passed.
- If a Vendor Order Cycle exists and is valid for the current day, the system
authorizes the purchase order; again, factoring in any specified delay.
- Otherwise, the system does nothing until the auto-authorize job runs again (factoring in any delay).
Then the PO is evaluated again, and compared with the Vendor Order Cycle value.
Hospitals that use auto-authorization often find it efficient to create a daily scheduled job to run the authorization before the earliest vendor order cutoff time. If you are setting up auto-authorization for POs from imported requisitions, be sure to schedule the auto-authorization job so that its timing meshes correctly with the timing of the requisition import.
Security: To set up automatic authorization, you need permission established in your user profile for purchase order authorization and for scheduling jobs. You also need to be able to edit Tables and Vendor Buy-From Location records.
The scheduled job setup steps are:
- Create a Scheduled Job Group identifier, if needed.
- Edit buy-from location records whose POs you wish to auto-authorize.
- For an EDI buy-from location, the PO Transmission Method must be EDI.
Important: If this field is not selected, the system
cannot authorize an EDI PO for the buy-from location. In this situation, a System Note is written to the PO.
- Select Auto Authorize EDI POs.
- On the buy-from locations' panels, assign a Scheduled Job Group identifier.
You can leave the field blank, but to pick up POs for the buy-from location(s), you must also leave the field blank on the job scheduler.
- If you wish to auto-authorize stat POs, you must set the Auto Authorize Stat POs flag on the asset location record.
- Create the scheduled job.
- Enter the Scheduled Job Group identifier on the scheduled job. You can also add a Scheduled Job Group identifier to an existing job.
To define a Scheduled Job Group identifier
- From the Materials Management main Contents, select Tables > Scheduled Job Groups.
- Click New (Figure 3).
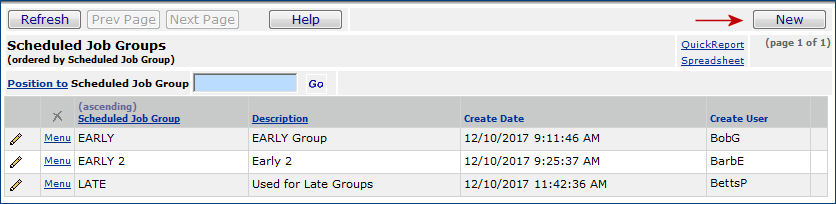
Figure 3 - List of Scheduled Job Groups Established for a Site
-
A panel appears for creating a group (Figure 4).
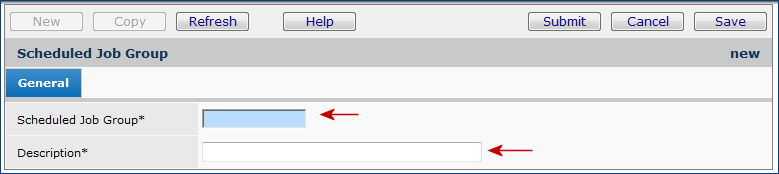
Figure 4 - Creating a New Scheduled Job Group Identifier
- Enter an identifier for the Scheduled Job Group.
- Enter a Description for the group.
- Click Submit.
The group identifier is available to use on scheduled jobs and buy-from locations.
To set up the the vendor buy-from location
- From the main Materials or AP Contents, select Vendors > Vendors.
- Locate the vendor that you need.
- Select Menu > Buy From Locations.
- Locate the buy-from location of interest.
- Next to the buy-from location name, click Menu > Edit, or click
the pencil icon. The Buy From Location Edit panel appears (Figure 5).
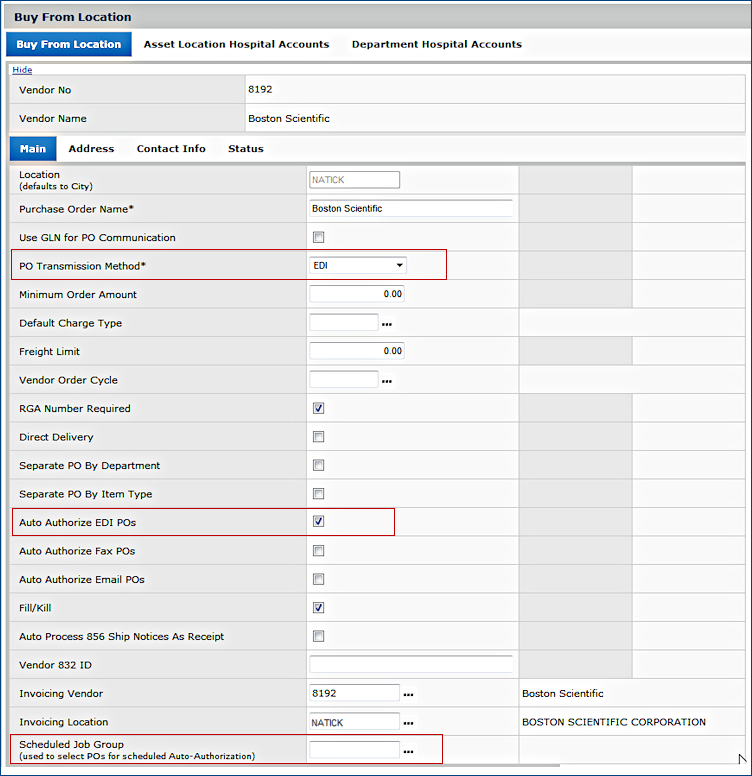
Figure 5 - Vendor Buy-From Location Edit Panel
- Make sure that the PO Transmission Method is EDI.
- Select the box next to Auto Authorize EDI POs.
- If you are using Scheduled Job Groups, click the prompt to assign a group to the buy-from location.
- Click Save.
- Click Submit.
To create a scheduled job for authorizing EDI POs automatically
- From the Work in Administration Contents, select Administration > Scheduled Jobs.
- Alternately, you can select Misc Functions > Scheduled Jobs.
The Scheduled Jobs list appears.
- Click New. The Create New Scheduled Job panel appears.
- Enter a description for your job in the Job Desc field.
- In the Job Name field, select Process Auto-Authorize EDI PO.
- Click Next. The Scheduled Job Edit panel appears (Figure
6).
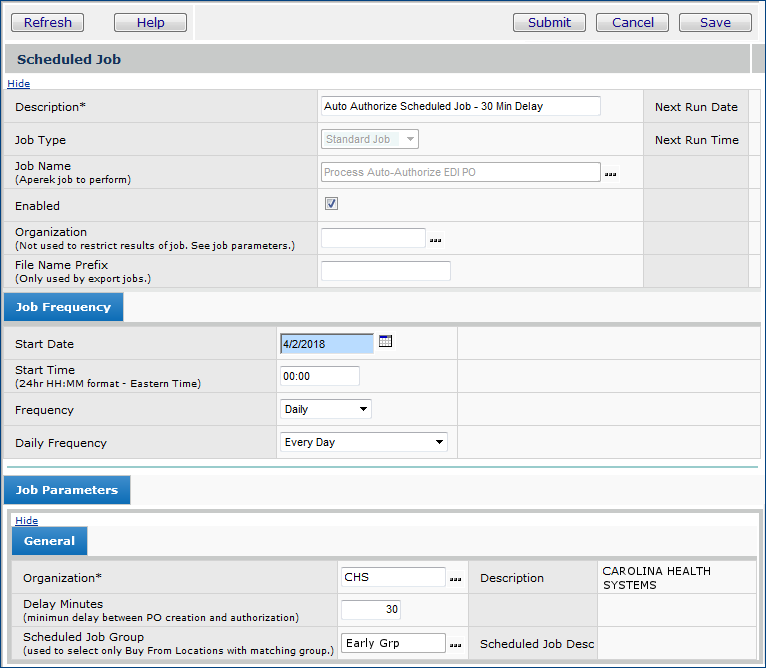
Figure 6 - Create and Schedule a Batch Job for Automatic EDI
PO Authorization
- Enter information in the Scheduled Job Edit tabbed panels as needed.
- Click Help for information on the fields.
- Select the Enable box if you wish the job to begin running
on the first scheduled opportunity.
- On the Job Parameters panel:
- Enter the Organization for
which the authorizations are to be made. This field runs the job for POs belonging only to the specified organization.
- If desired, set a time delay. Enter the number of minutes in the Delay Minutes field.
The Delay Minutes is the amount of time after creating a PO before the PO can be automatically authorized. The PO will not be authorized during the delay period,
even if the authorization job is scheduled to run. The PO will be authorized, in this case, during the next run of the job.
- Select a Scheduled Job Group, or leave this field blank. If you leave the Scheduled Job Group identifier field blank, only buy-from locations without a Scheduled Job Group assignment are included in the job.
In Figure
6, the automatic authorization is limited to POs from Organization CHS. An auto authorization job with a thirty minute delay is being scheduled. The Scheduled Job Group is Early Grp.
- Click Save.
- Click OK.
The system returns you to the Scheduled Jobs list.
- Click Refresh to see your job appear on the list.
For details on using the job scheduler for FAX and email purchase orders, see Auto-Authorize EDI, FAX, or email POs by Buy-From Location.
Associating a Vendor with a Supply Chain EDI Vendor
The first task in setting up your vendor is to obtain several pieces of information
from the vendor. You will need IDs that identify you to your vendor for EDI
processing, EDI document types (which you may already know), and more (Table
1). You can also view and print Table 1 information on an Adobe Acrobat .pdf
form to send to a vendor for completion.
Note: This information provides
values for fields on the ISA (Interchange Control Header) and GS (Functional
Group header) of an EDI document.
Table 1 - EDI Vendor Setup
Information
(Shaded areas are selectable fields on the panels.
Other areas are fields where information must be keyed in.)
Hospital
Information |
Vendor
Information |
Supply Chain
Information |
| Available
in Supply Chain vendor records
|
Obtain
this information from your vendor. |
Available
in Supply Chain from the EDI Vendors list. |
|
Vendor
No:
|
The values below may be unique for each buy-from location
or ship-to organization.
Account Numbers for Departments
/Asset Locations:
|
EDI
Vendor ID:
|
|
Vendor
Name:
|
|
|
Buy-From
Location name:
|
|
Ship-To
Organization name:
|
|
Customer
Interchange ID (ISA 06):
|
|
Customer
Qualifier (ISA 05):
|
|
Customer
Interchange ID Test:
|
|
Customer
Qualifier Test:
|
|
Customer
Application Code:
|
|
Customer Interchange ID
(Direct Delivery):
|
|
Customer Qualifier
(Direct Delivery):
|
Customer Application Code
(Direct Delivery):
|
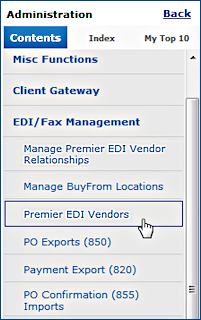
To view Supply Chain EDI vendors:
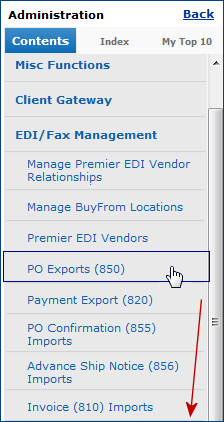
- From the Work in Administration main Contents, select EDI/Fax Management
> EDI Vendors.
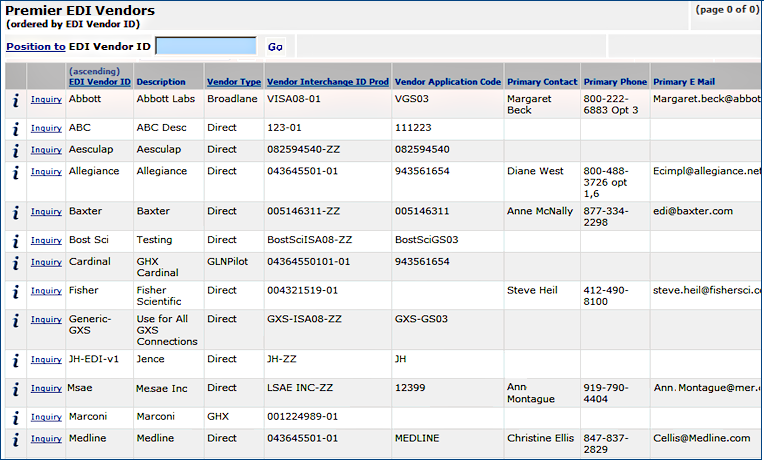
The list of Supply Chain EDI vendors appears (Figure 7).
Figure 7 - Supply Chain EDI Vendors List
- Click Inquiry or i to view EDI transaction header fields for the vendor (Figure 8).
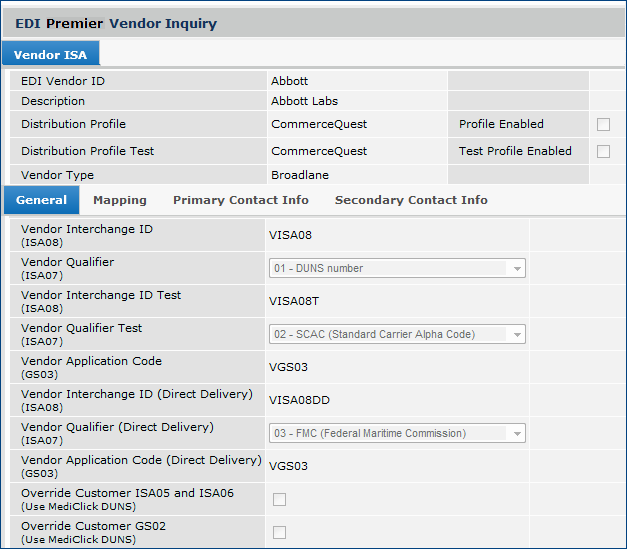
Figure 8 - ISA Fields for an EDI Vendor in the Supply Chain Database
- The General panel shows values for the EDI header fields ISA 08 (Vendor
Interchange ID) and ISA 07 (Vendor Qualifier), test versions of
the same fields, and values used for direct delivery purchase orders including
GS 03, the Vendor Application Code.
- Depending on your site's EDI configuration,
your customer ISA header values may be overridden, and Supply Chain identifiers
used instead. In this case, the appropriate Override boxes are selected.
(Customer header values are explained subsequently.)
- The Primary Contact Info and Secondary Contact Info panels record the name,
phone number, and email address of the main contact (and a secondary contact,
if available) at the vendor location. This contact is the person who works
with EDI issues.
- The Mapping panel (Figure 9) shows the types of EDI transactions that are
enabled for the vendor. The Map Name is used by Supply Chain...you can
ignore it.
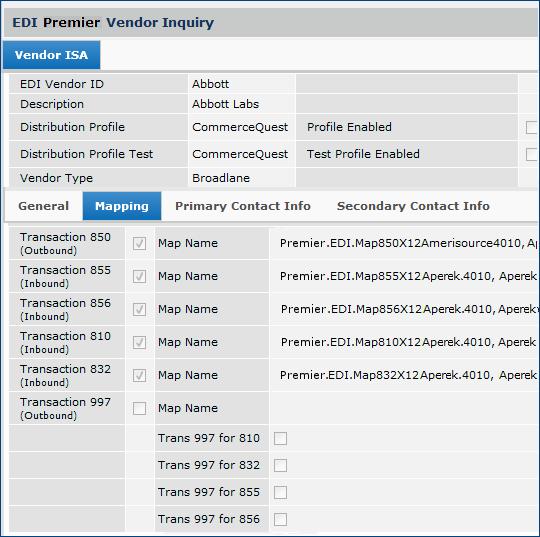
Figure 9 - Enabled EDI Transaction Types for an EDI Vendor
To
set up an EDI vendor
- Have the completed form from your vendor
handy while you work on the steps below.
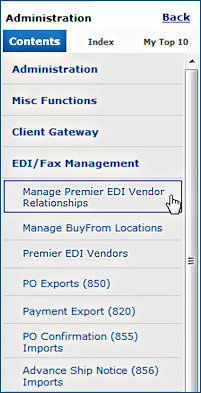
- From the Work in Administration main Contents, select EDI/Fax Management
> Manage EDI Vendor Relationships.
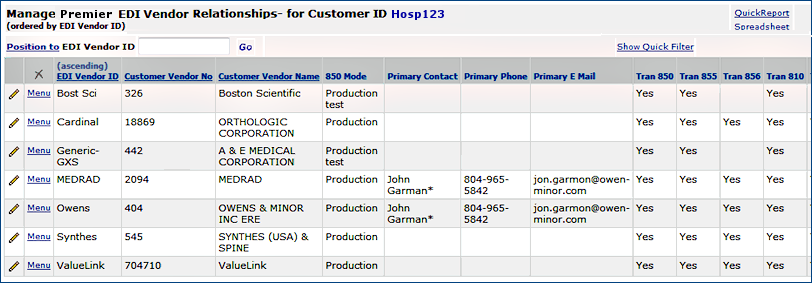
The list of your site's EDI vendors appears (Figure 10), or No Data if none
are associated with Supply Chain EDI vendors.
Figure 10 - List of Customer EDI Vendors
- Click New to set up a new vendor, or click the edit icon
 to edit information
for an existing vendor.
to edit information
for an existing vendor.
Figure 11 appears.
• This panel makes the association
between the vendor in your site's Supply Chain records and the same vendor in
Supply Chain's master administrative EDI records.
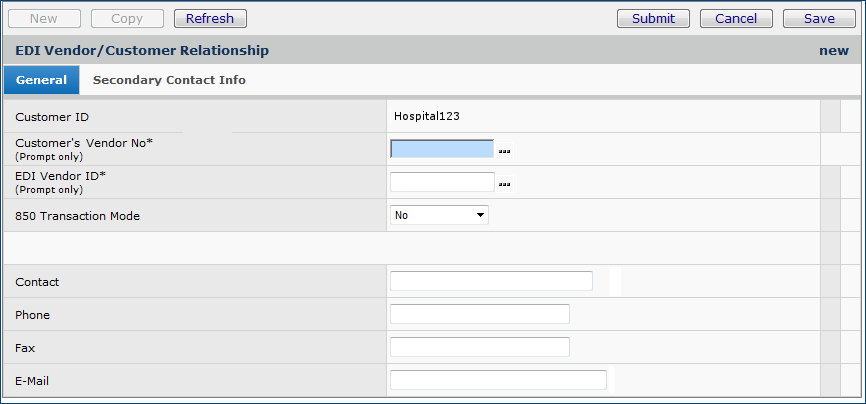
Figure 11 - Edit Panel for Customer/Vendor Relationship
For a new relationship (Figure 11), the
Customer's Vendor No and EDI Vendor ID are empty fields.
The 850 Transaction Mode field is set to the default of No.
Note: If you are editing an existing vendor/customer
relationship, some fields on the panel will be completed. Also, for an edit,
you can only change the 850 Transaction Mode field and enter contact
information.
- To establish a new relationship, click the prompt or the arrow
after each field to select the appropriate information.
- The
Customer's Vendor No is your Vendor No
for the EDI vendor.
- The
EDI Vendor ID is Supply Chain's corresponding vendor ID for
the vendor.
- Select the 850 Transaction Mode, as appropriate:
You can select Production, Production Test, or Test.
Leave the No default if you will not be using EDI 850 transactions.
See the subsequent discussion on Using Test and Production
Modes.
- Click Save to save your data.
- When you are finished, click Submit.
Supply Chain displays the list of Customer EDI Vendors (Figure 10).
- Click Refresh to view the vendor you set up.
You can write notes or read existing notes for each vendor in the EDI Vendor
ID column.
- To read existing Notes, click the yellow tablet icon
 next to an EDI Vendor ID.
- To write notes, select Menu > Notes > New next to
any EDI Vendor ID.
Entering ISA Information for Vendor Buy-From
Locations
Many vendors with multiple buy-from locations prefer that EDI transactions
are sent to one central location. The vendor then takes responsibility for routing
the EDI documents to the appropriate buy-from locations. In this typical case,
you will not need to enter separate ISA values for each different buy-from location.
Some vendors with multiple buy-from locations want EDI orders to go directly
to those locations during the EDI interchange process. For these vendors, you
will need to enter ISA information for any buy-from locations that you use.
The instructions are in the following paragraphs.
To enter ISA information for customer vendor buy-from locations:
- Have the completed form from your vendor handy while you work on the steps
below. You may need to set up multiple buy-from locations, depending on how
you purchase from the vendor.
- Locate the vendor on the list of Customer EDI Vendors (Figure 10).
- Click Menu > ISA Info next to the vendor.
If buy-from locations for the vendor have been set up for EDI processing,
the list appears (Figure 12).
Otherwise, No Data appears.
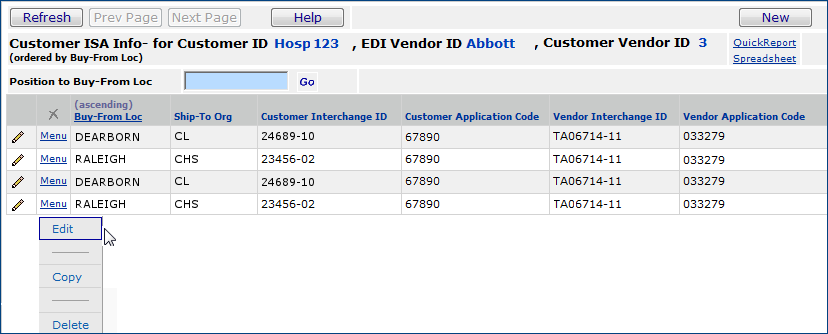
Figure 12 - Buy-From Locations Set Up for a Customer EDI Vendor
Figure 12 shows several buy-from locations for vendor Abbott.
The default is the top buy-from location. When an EDI transaction is sent to
a buy-from location, the system determines if the buy-from location has its own
EDI settings. If not, the default is used.
- Select Menu > Edit or click the edit icon to edit an
existing buy-from location relationship. For example, see Figure 13.
- On Figure 13, notice that the customer vendor Abbott Labs
whose Vendor No is 3 has been associated
with the Supply Chain EDI Vendor ID of Abbott.
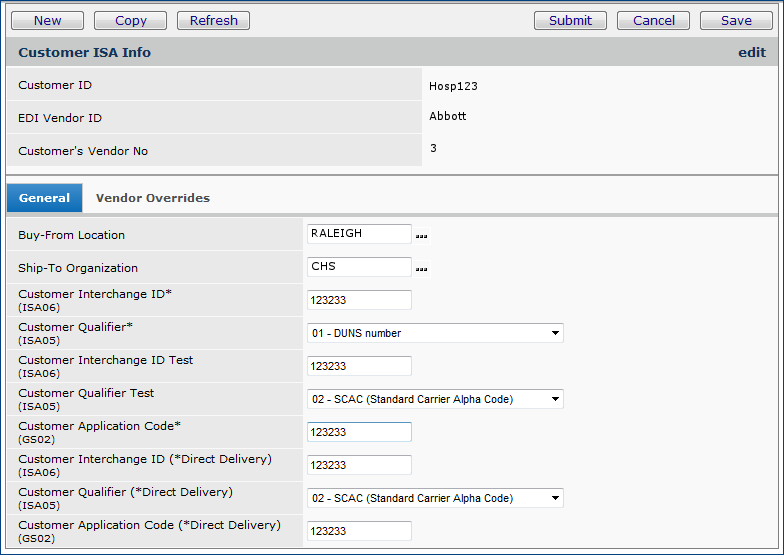
Figure 13 - ISA Fields for the EDI Customer
Or,
- Click New to set up a new relationship with a
buy-from location. Figure 14 appears.
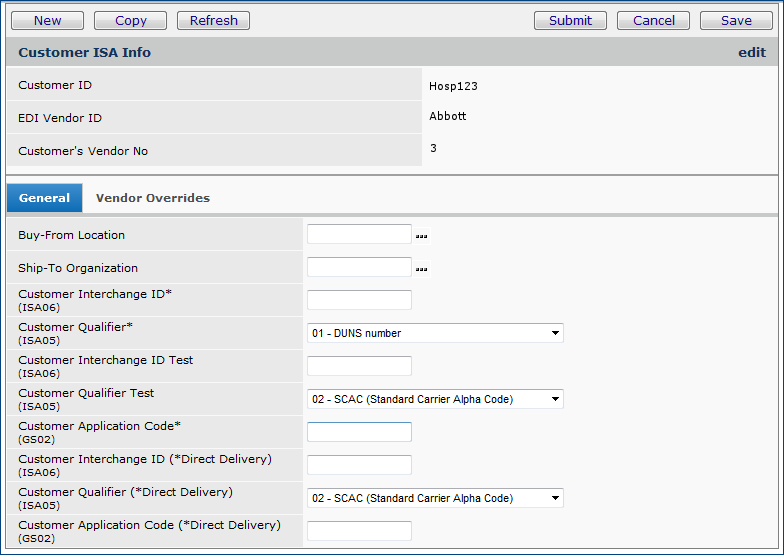
Figure 14 - ISA Fields for Customer EDI Vendor Edit Panel
- Complete the fields on the General tab using information provided
by the vendor.
- Select the Buy-From Location and the Ship-To Organization.
- Enter the Customer Interchange ID (ISA06) and Customer Qualifier
(ISA05). If your vendor uses Supply Chain as the ISA06, it does not matter
what you enter, but you must enter something.
- Notice that you can define test and direct delivery Customer Interchange
IDs and Customer Qualifiers for a buy-from location.
- The Vendor Overrides panel is for future capabilities. (You can ignore it.)
- Click Save.
- Click Submit when you are finished entering data in fields
on the General tab.
The system returns to the list of buy-from locations.
- Click Refresh to see your buy-from location appear on the
list.
After you have set up the ISA fields, you may have one last step:
- If departments or asset locations at your site have vendor account numbers,
you will need to enter the account numbers. (See Using
hospital account numbers.)
Using Test and Production Modes
On Figure 8 and Figure 13, notice that
Vendor and Customer Qualifiers and Interchange IDs
can be specified for transactions as production, test, or
direct delivery. You select the EDI 850 Transaction Mode
- Production, Production Test, or Test
- on the Edit Vendor/Customer Relationship panel (Figure 11).
For Production, the system does the following:
- Sets a production indicator (in the ISA15 field).
- Uses the production ISA values.
- Sends purchase orders to the vendor's production system.
For Production Test, the system does the following:
- Sets a test indicator.
- Uses the test ISA values (Figure 8 and Figure 13).
- sends purchase orders to the vendor's production system.
For Test, the system does the following:
- Sets a test indicator.
- Uses the test ISA values (Figure 8 and Figure 13).
- Sends purchase orders to the vendors test system.
Direct Delivery EDI purchase orders use
the Direct Delivery ISA values and are sent to the
vendor's production system. Direct delivery EDI purchase orders are also discussed
in Using Hospital Account Numbers for a Department, Asset
Location, or PO Line.
Work
with EDI Test Purchase Orders
You will probably want
to create and send test purchase orders once you have EDI configured for your
organization. Creating an EDI test purchase order follows the same process as
creating any other purchase order, with some additional recommendations about
the purchase order number.
When you authorize your
purchase order, you can view its status to see how the status changes. You can
also open the EDI 850 document and view the code, if you need to troubleshoot.
After you create and send
some test EDI purchase orders, when they are no longer needed, you will want
to delete them. Before you can delete a sent EDI PO, you must unauthorize the
PO, and then delete it. Your user profile authority
"Allow Unauthorization of Sent EDI PO" must be set as well.
To
create and send a test EDI PO
Note: The instructions below for creating a purchase
order are condensed. See Create a PO Manually for
details.
- From the Materials Management main Contents, select Purchasing > Purchase Orders (by PO) or Purchase Orders (by Create Date).
The list of POs ordered by PO number or by create date (as you selected) appears.
- Click New.
The Create New PO - Purchase Order Header panel appears (Figure 15).
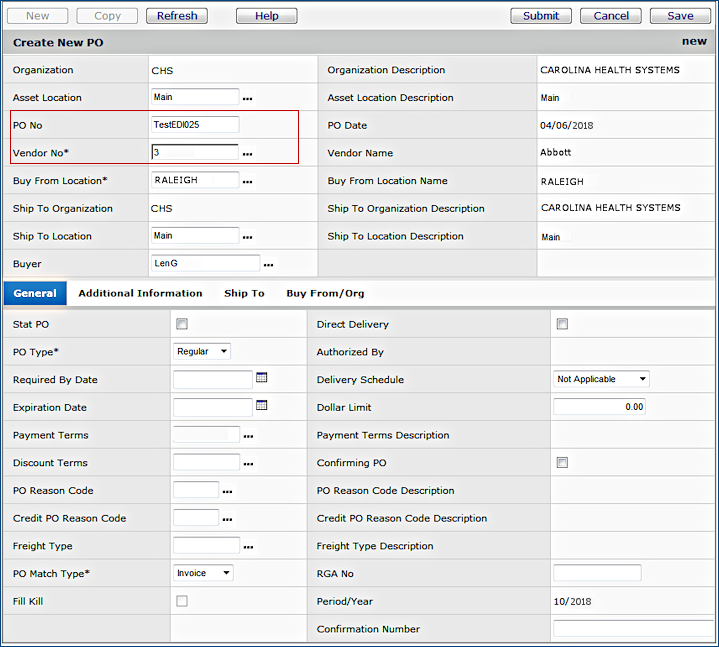
Figure 15 - Create New PO / Purchase Order Header Panel
- Enter a PO No using the format:TestEDInnn where
nnn is a sequential number, e.g. TestEDI025
- Select the EDI Vendor No.
- Click Submit.
The Purchase Order panel appears with "No Data" in the lower section.
- Click New in the lower section of the panel. The PO Lines panel appears.
- Enter a line for the PO as follows:
- Select an Item No.
- Enter an Ordered Quantity.
- Click Submit.
The Purchase Order panel appears.
- Click Refresh to see the ordered line.
- Click Authorize.
The system asks you to confirm that you wish to authorize the PO.
- Click Submit
The system displays the Purchase Orders list.
- Click Refresh to view your PO, and see how its status changes.
Viewing EDI Transaction Documents
You can view EDI documents that have been transmitted to vendors (e.g., EDI
850 purchase orders) and received from vendors (e.g., EDI 832 catalog imports,
EDI 855 PO confirmation imports, etc.). The system provides a list of imports
and exports, and also the capability to view the text of the EDI document. The
section below is an example for EDI 850 Purchase Orders.
Before you open EDI documents, you need to install the Supply Chain X12 Viewer
on your system. The download and installation is available from the EDI/Fax Management
menu (Figure 16).
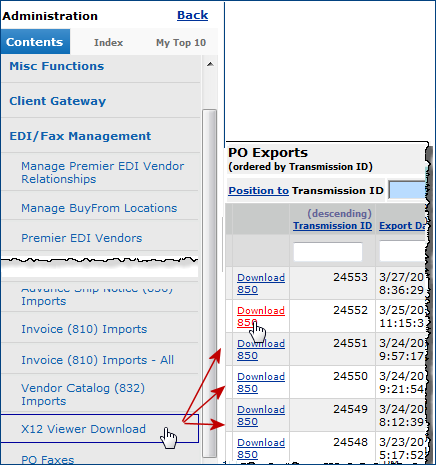
Figure 16 - EDI / Fax Management Contents: X12 Viewer Download
To download the X12 Viewer:
- From the Work in Administration main Contents, select EDI/Fax Management
> X12 Viewer Download.
The X12 Download panel appears.
- Select "Click Here to Download this File."
The Windows dialog box appears, asking you if you would like to open or save
the file.
- Click Open.
The first panel of the Install Wizard appears.
- Follow the instructions on the Install Wizard panel.
Click Next.
- Repeat Step 4 to process through the Install Wizard.
- When the Install Wizard is finished installing the viewer, you receive a
message.
- Click Finish.
You are now ready to view EDI transaction files.
To view a list of EDI imports or exports:
- From the Work in Administration main Contents, select EDI/Fax Management
> PO Exports
The list of PO Exports appears (Figure 17).
 |
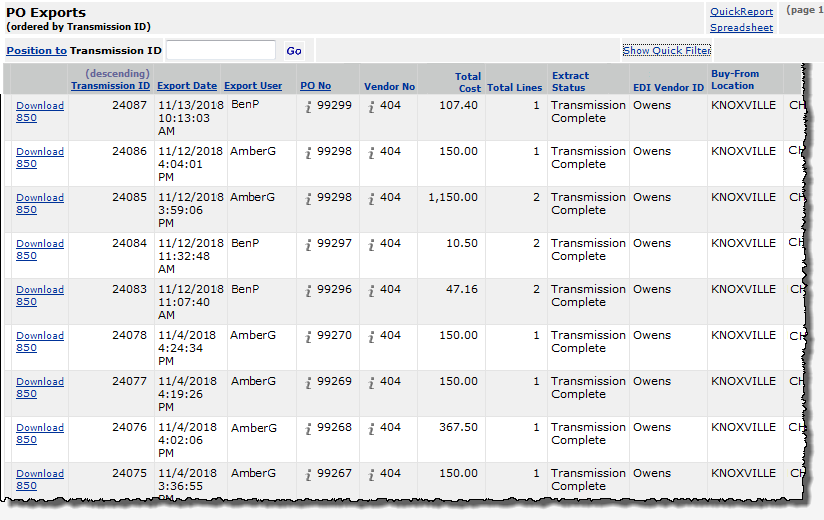 |
Figure 17 - PO ExportList |
Note: In addition to PO Exports (850),
you can also view the following:
| PO Confirmation
(855) Imports |
| Advance
Ship Notice (856) Imports |
| Invoice
(810) Imports |
| Vendor
Catalog (832) Imports |
- To view the actual EDI document code, click Download 850.
The Windows dialog box appears, asking you if you would like to open or save
the file.
- If you Open the file, it appears in the X12 Viewer.
- You may wish to Save the file to a directory. Open it later with
an editor that will break the lines into a readable form.
Figure 18 shows a sample PO Export that has been downloaded and opened for
viewing.
Figure 19 shows part of a similar PO Export, except that Figure 19 contains
the SDQ field, which is used for direct delivery.
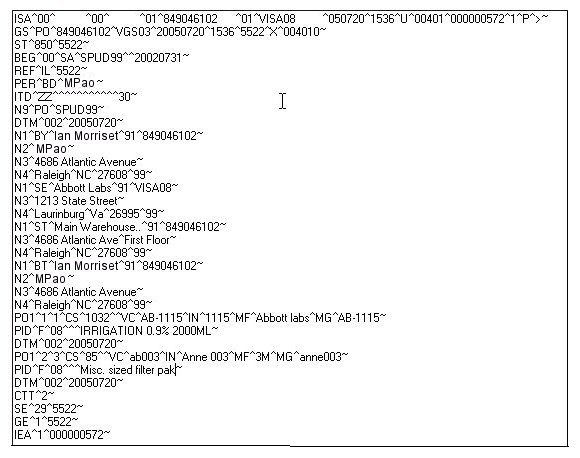
Figure 18 - Sample Downloaded EDI 850 PO Transaction Document
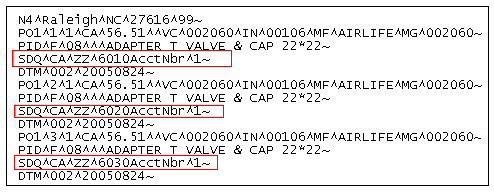
Figure 19 - Part of a Downloaded EDI 850 PO With Direct Delivery
Information
On Figure 19A, the SDQ lines (marked in red) are direct-delivery
department accounts for each of three PO lines.
To
delete a test EDI PO:
- From the Materials Management main Contents,select Purchasing > Purchase Orders (by PO) or Purchase Orders (by Create Date).
The list of POs ordered by PO number or by create date (as you selected) appears.
- Locate the purchase order
that you need.
- Next to the purchase order, select Menu > Unauthorize PO.
The system asks you to verify that you wish to unauthorize the PO (Figure 20).
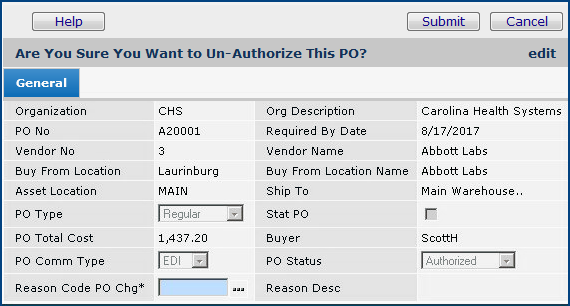
Figure 20 - Confirm Unauthorize EDI PO Panel
- Enter a value in the Reason Code PO Change field and click
Submit.
A message appears (Figure 21).

Figure 21 - Message Displayed When Unauthorizing an EDI PO
- Click OK.
The system returns you to the Purchase Orders list. The Status of the purchase
order changes to "Unauthorized."
- Next to the purchase orders, select Menu > Delete.
The system displays a panel asking you to confirm the deletion
- Enter a Reason Code and click Submit.
The purchase order is deleted and disappears from the Purchase Orders list.
Using
Hospital Account Numbers for a Department, Asset Location, or PO Line
For each of its buy-from locations, a vendor may assign a hospital
account number to be used by asset locations and/or departments that order supplies
from the buy-from location. Figure 22 is a typical scenario.
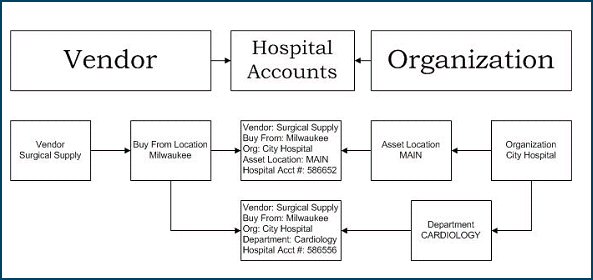
Figure 22 - Scenario for Vendor Buy From Hospital Accounts
The following instructions
explain how to enter hospital account numbers for use by EDI 850 transactions.
To
enter your department/asset location hospital account number for a buy-from
location:
- Have the completed form from your vendor
handy while you work on the steps below.
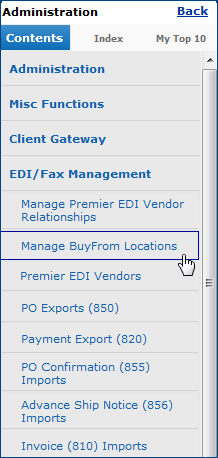
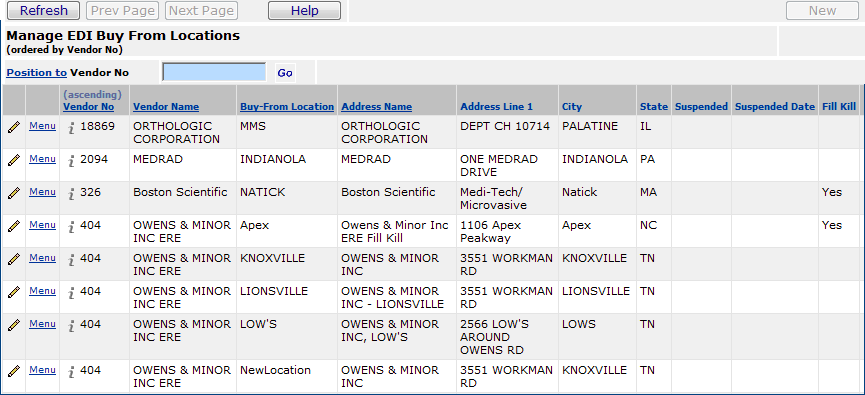
- From the EDI Administration Contents, select EDI/Fax Management >
Manage Buy-From Locations.
The list of EDI vendors and buy-from locations appears (Figure 23). Each buy-from
location for a vendor is listed separately.
Figure 23 - Manage EDI Buy-From Locations
Note on Searching a List:
Figure 23 shows a list with the Quick Filter open. You can use the Quick Filter
on lists to find data easily. Columns that can be searched have an underlined
column header. When the Quick Filter is open, blank boxes appear under the
column headers.
To use a Quick Filter:
- If the Quick Filter is not open, click Show Quick Filter.
Blank boxes appear at the top of the columns under the
column headers.
- Enter a search value in one of the boxes.
- Click Enter(or click Go -- next to Position To).
The system positions the list to the row containing the value you specified.
If the value does not exist in the list, No Data appears.
You can use the % "wild card" to substitute for characters
in a search value. You can also search for a row that contains multiple values
by entering the values in several column boxes. See Using
Quick Filters for details.
- Next to a buy-from location Vendor No (Figure 23), click Menu >
Department Accounts or Menu > Asset Location Accounts (as appropriate).
A list of department hospital accounts (Figure 24) or asset location hospital
accounts appears.
No Data appears if no departments/asset locations have been set up.
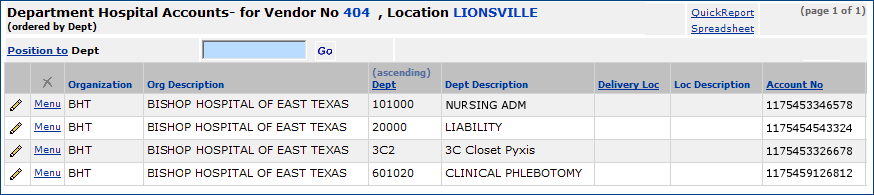
Figure 24 - Department Accounts for an EDI Buy-From Location
- Click New to create a new department account or asset location
account for the buy-from location
The Department Hospital Account panel appears (Figure 25).
(For an asset location, the similar Asset Location Hospital Account panel
appears.)
- Select Menu > Edit or click the edit icon
to edit an account.

Figure 25 - EDI Department Hospital Account Entry Panel
- Select the Department (or Asset Location) from the
prompt.
- Select the Deliver To Location, if applicable. (The Asset Location
Hospital Account panel does not have this field.)
- Enter the Hospital Account Number associated with the vendor buy-from
location.
- When you are finished, click Save.
- Click Submit.
The system displays the Department or Asset Location Accounts list.
- Click Refresh to view the listing for the account.
Placement of Hospital Account Numbers
on an EDI Document
The application places the customer's
hospital account number on the EDI document in the N1 ST segment (N104), unless
the purchase order is direct delivery. For direct delivery, the hospital account
number is placed on the purchase order lines in the PO Line Information segment
(PID).
Note: Direct delivery can be
required by either the vendor or the department.
The following flowcharts (Figure 26 and Figure 27) show the process
used by the application to determine how to handle the hospital account number.
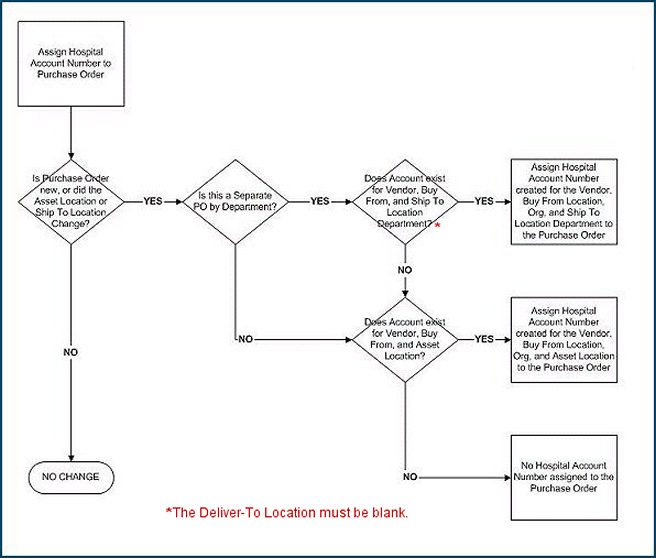
Figure 26 - Assigning a Hospital Account Number to a Purchase
Order
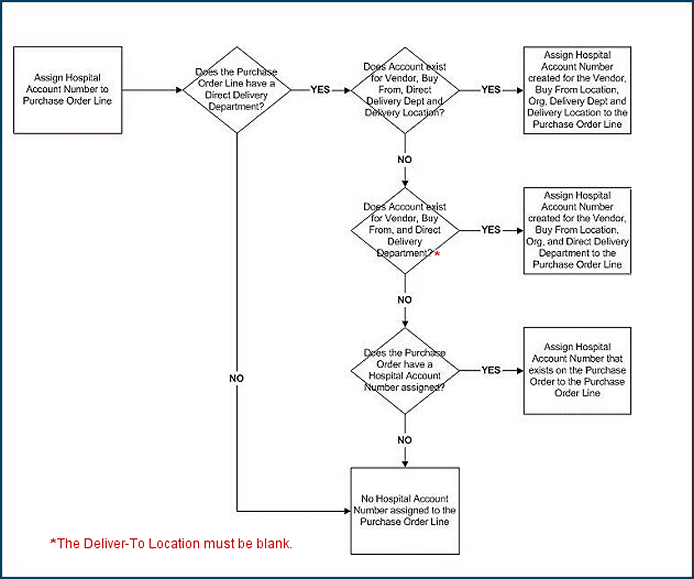
Figure 27 - Assigning a Hospital Account Number to a Purchase
Order Line
As you are working with the EDI setup panels, you will find specific information
about fields by clicking the Help button. You will also want to work
closely with your vendor to make sure that you have the correct identifiers
to enter in Supply Chain, and to run tests as necessary.
Copyright © 2023 by Premier Inc. All rights reserved.